
Nowadays, DevOps or Platform teams are challenged with abstracting and hiding the infrastructure complexity and building consumer-friendly solutions. These platforms must be easily adjustable, operatable, scalable, and secure. It is not an easy task if you consider that the required skillset in the cloud-native and Kubernetes landscape is rare, and often, not enough resources are available internally or externally. This is also reflected in the State of Kubernetes 2023 report, where 57% of the participants answered that “inadequate internal experience and expertise” is the number one challenge in managing Kubernetes.

That is one of the many reasons why automation is one of the most essential topics for DevOps or Platform teams. In this blog post, I want to demonstrate how to use Infrastructure as Code (IaC) with Terraform in combination with GitOps to achieve end-to-end automation using VMware Tanzu Mission Control (TMC).
TMC is VMware’s multi-cloud Kubernetes management solution, and it can be used as a SaaS offering or as a self-managed deployment option on-premises. If you want to learn more about deploying TMC on-premises, look at one of my recent blog posts here.
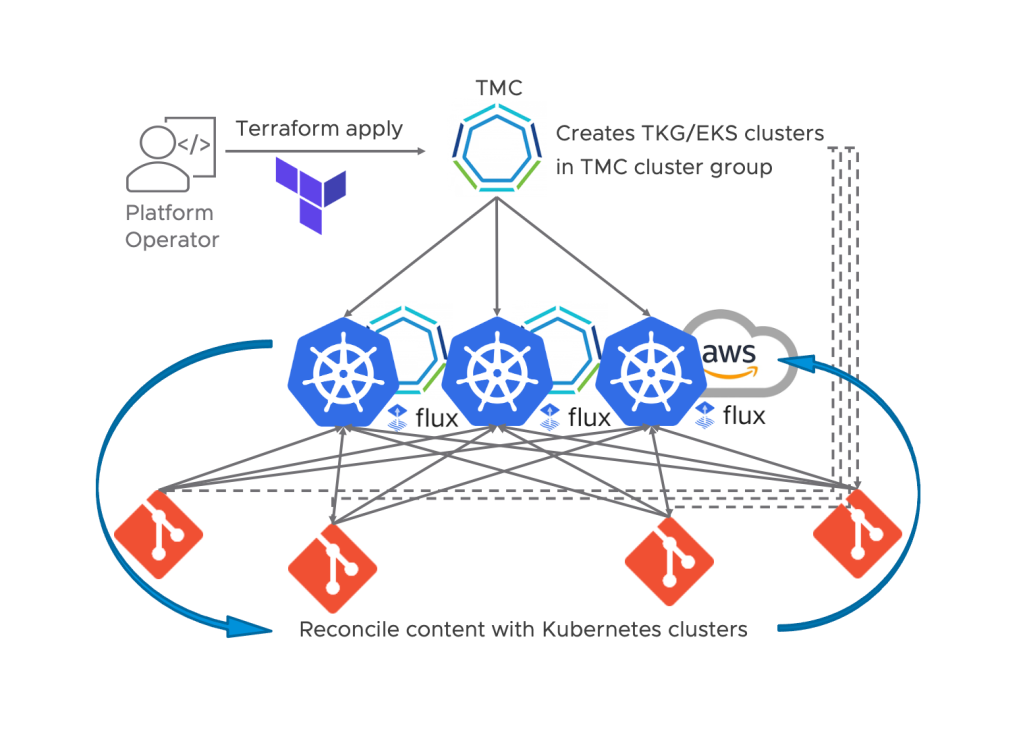
For my scenario, I will use the TMC terraform provider to deploy and configure an AWS EKS cluster in my region of choice. Further, we will use the Continuous Delivery (CD) feature of TMC, which is based on FluxCD, to configure our cluster and to deploy our workload in GitOps fashion.

TMC offers a very convenient way to apply and continuously synchronize Kubernetes manifests in a GitOps approach to multiple clusters without the need to configure CD on each cluster. Kubernetes clusters can be grouped in so-called Cluster Groups. Platform Operators can then define security, access, CD sources (Git repository and path to manifests), and more once on the Cluster Group level, and every cluster will inherit the configuration. FluxCD will be automatically deployed on each cluster in the Cluster Group, and the content from the Git repository will be picked up and synchronized with all clusters.

We will make use of the TMCs CD functionality on the Cluster Group level in this article. If you want to learn more about FluxCD and how it works under the covers, look at one of my previous blog posts here.
What do we need?
Before we can start, we need the following prerequisites in place.
- A VMware TMC account with a trial or purchased subscription. We are going to use the SaaS version of TMC.
- An AWS account for our EKS deployment.
- Terraform cli installed on our client. As I am using Mac OS, I simply used homebrew as described here and installed version 1.5.7.
- The latest TMC terraform provider from here. Version 1.2.4 at the time of writing this article.
- Access to a Git-based code repository and the git cli installed on our client.
- The latest Tanzu cli installed on our client.
- Compatible kubectl version available on our client.
- Optional: Visual Studio Code with the HashiCorp Terraform extension.
- Optional: AWS cli installed on our client.
Let’s put it together!
1. Connect the AWS account with TMC
The first thing we will do is to configure our AWS account in TMC. Once done, we can deploy and life-cycle EKS cluster from TMC. Besides EKS, TMC supports cluster life-cycle functionality for Tanzu Kubernetes Grid (TKG) and Microsoft AKS clusters. Other Kubernetes conformant clusters (DIY, Rancher, OpenShift…) can be attached to TMC, but cluster life-cycle operations will not be possible.
The process is pretty straightforward, and we are not going to cover it in much detail. Simply follow the documentation here and create a Cloud Formation Stack template which will create the necessary AWS role via the AWS console. After the creation of the stack, we need to copy the role ARN from the outputs section and use it in TMC to establish the connection.

If we have done everything correctly, we should see the credentials showing up as “valid” under the Administration/Accounts section of TMC:

Additionally, we need to make a note of two more ARN roles that have been created during our stack run. We can collect these using the AWS console and go through the resources section of the stack run, or we use the AWS cli. Simply insert the GeneratedTemplateID of your Cloud Formation Stack template in the command, and you should get your roles and the associated ARN.
➜  aws iam list-roles | grep 'worker.<GeneratedTemplateID>\|control-plane.<GeneratedTemplateID>'
            "RoleName": "control-plane.<GeneratedTemplateID>.eks.tmc.cloud.vmware.com",
            "Arn": "arn:aws:iam::012345678912:role/control-plane.<GeneratedTemplateID>.eks.tmc.cloud.vmware.com",
            "RoleName": "worker.<GeneratedTemplateID>.eks.tmc.cloud.vmware.com",
            "Arn": "arn:aws:iam::012345678912:role/worker.<GeneratedTemplateID>.eks.tmc.cloud.vmware.com",
2. Create a VPC for EKS cluster life-cycle
Before we can start using our newly added AWS account with TMC for EKS cluster life-cycle, we need to create a VPC with public and private subnets as described here. I am not going to cover the VPC creation task in this blog post. Nevertheless, we have to execute a similar process than before using a Cloud Formation Stack template in our AWS region of choice. Simply follow the procedure documented here for “public and private subnets” and use the URL for the IPv4 configuration. After creating the stack, we should make a note of the created subnets, security groups, and VPC, which we can find under the outputs section.

Once that is done, we should be able to create and life-cycle EKS clusters from the TMC UI. Nevertheless, we want to do it in an automated way, so let’s move on to the TMC Terraform provider.
3. Prepare the TMC Terraform Provider
We should have the TMC Terraform provider already downloaded to a folder that we will use to work with Terraform-related files. Now we need to unpack the zip file and inspect the files.
➜  tar -xzf terraform-provider-tanzu-mission-control_1.2.4_darwin_amd64.zip
➜  ls
LICENSE                                                         terraform-provider-tanzu-mission-control_1.2.4_darwin_amd64.zip
README.md                                                       terraform-provider-tanzu-mission-control_v1.2.4
To configure the provider, we must create a main.tf and variables.tf file in the same folder. We specify the TMC Terraform provider version and two variables for the API endpoint and token in the main.tf as shown here:
terraform {
  required_providers {
    tanzu-mission-control = {
      source = "vmware/tanzu-mission-control"
      version = "1.2.4"
    }
  }
}

provider "tanzu-mission-control" {
  endpoint = var.endpoint
  vmw_cloud_api_token = var.vmw_cloud_api_token
}
In the variables.tf we will define the type and value of our variables:
variable "endpoint" {
  description = "The Tanzu Mission Control service endpoint hostname"
  type = string
  default = "your-tmc-org-api-endpoint"
}

variable "vmw_cloud_api_token" {
  description = "The VMware Cloud Services API Token"
  type = string
  default = "your-api-token"
}
Note: You should define many more variables if you want to make your Terraform scripts reusable and work with tfvars for different environments and deployments.
In case you wonder where to get the API endpoint and token from. The endpoint can quickly be taken from the browser URL once logged in to your TMC cloud org.

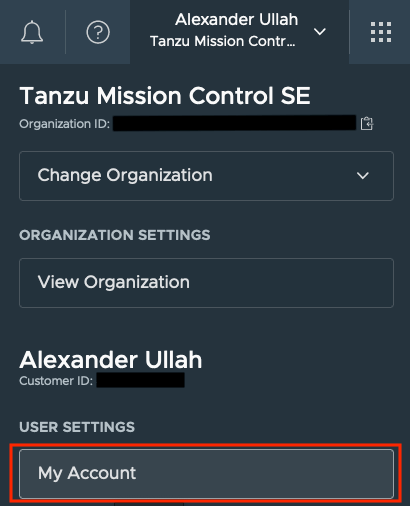
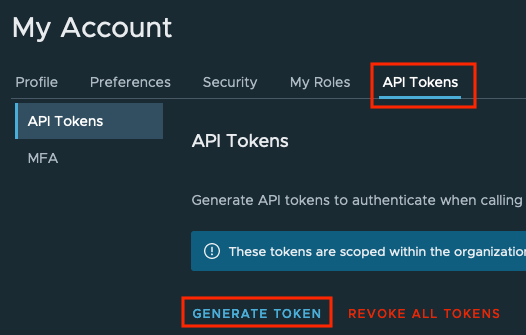
The API token can be created from the “My Account” section by clicking on your name in the top right corner. Select the “API Tokens” tab and click “GENERATE TOKEN”. Make sure the token has enough privileges to create workload clusters.
After we have created the necessary files, we can initialize our Terraform backend with the following command:
➜  terraform terraform init

Initializing the backend...

Initializing provider plugins...
- Finding vmware/tanzu-mission-control versions matching "1.2.4"...
- Installing vmware/tanzu-mission-control v1.2.4...
- Installed vmware/tanzu-mission-control v1.2.4 (signed by a HashiCorp partner, key ID 6B6B0F38607A2264)

Partner and community providers are signed by their developers.
If you'd like to know more about provider signing, you can read about it here:
https://www.terraform.io/docs/cli/plugins/signing.html

Terraform has created a lock file .terraform.lock.hcl to record the provider
selections it made above. Include this file in your version control repository
so that Terraform can guarantee to make the same selections by default when
you run "terraform init" in the future.

Terraform has been successfully initialized!

You may now begin working with Terraform. Try running "terraform plan" to see
any changes that are required for your infrastructure. All Terraform commands
should now work.

If you ever set or change modules or backend configuration for Terraform,
rerun this command to reinitialize your working directory. If you forget, other
commands will detect it and remind you to do so if necessary.
Great, the initialization finished successfully. Now, let’s continue with writing some Terraform scripts.
4. Create a Terraform script for Cluster Group creation
We can create the Cluster Group and configure CD via the TMC UI. However, we want to use Terraform and create everything automated in one go. We can start by using the example shown here. The only thing we might wanna change are the name and labels.
# Create Tanzu Mission Control cluster group
resource "tanzu-mission-control_cluster_group" "create_cluster_group" {
  name = "aullah-demo-clgrp"
  meta {
    description = "Create cluster group through terraform"
    labels = {
      "owner" : "aullah",
    }
  }
}
5. Create a Terraform script for CD configuration
Next, we want to configure CD on our Cluster Group. To accomplish this, we will create two Terraform scripts. One in which we specify the Git Repository we want to connect and another for the Kustomization, which defines the path to our Kubernetes manifest within the repository.
I am just going to use a simple web app for our CD configuration, but it could also be a cluster configuration, a Tanzu Package, or any kind of Kubernetes manifest that you want to be synced with every cluster in the Cluster Group.
As we need specific resources, such as the Cluster Group, to be available before creating our CD resources, we will use Terraform’s “References to named values” to create an implicit dependency between the two resources.
Here are some of the parameters for the Git Repository Terraform script you might want to change according to your needs:
| Parameter | Description |
|---|---|
| name | Specify the name of the TMC Git repository object. |
| namespace_name | Only change this if you want your FluxCD custom resources created in a different namespace. TMC will create and use the “tanzu-continuousdelivery-resources” namespace per default! |
| scope.cluster_group.name | Specify the name of your TMC Cluster Group. In this example, we reference a named value from the Cluster Group creation script to create an implicit dependency. |
| spec.url | The URL to your Git repository that you want to connect. |
| spec.interval | The interval in which the FluxCD controller will check the repository. |
| spec.ref.branch | The Git branch of your repository you want to use. |
# Create Tanzu Mission Control git repository with attached set as default value.
resource "tanzu-mission-control_git_repository" "create_cluster_group_git_repository" {
  name = "my-demo-repo" # Required

  namespace_name = "tanzu-continuousdelivery-resources" #Required

  scope {
    cluster_group {
      name = tanzu-mission-control_cluster_group.create_cluster_group.name # Required
    }
  }

  meta {
    description = "my demo app repo"
    labels      = { "owner" : "aullah" }
  }

  spec {
    url                = "https://github.com/beyondelastic/vmware-explore-app" # Required
    interval           = "5m"    # Default: 5m
    git_implementation = "GO_GIT" # Default: GO_GIT
    ref {
      branch = "main"
    }
  }
}
Let’s continue with the script to create the Kustomization resource. Please review the parameters and change them according to your needs (name, namespace-name, and scope.cluster_group.name parameters are not listed again as the approach is equal to what is explained above):
| The target namespace to which your Kubernetes manifests will be applied. | Description |
|---|---|
| spec.path | The path within your Git repository where the Kubernetes manifests are stored. |
| spec.prune | Clean up objects from the cluster if the referenced object/is missing (true/false). |
| spec.interval | Interval in which the controller detects and corrects drift. |
| spec.target_namespace | The target namespace to which your Kubernetes manifests will be applied to. |
| spec.source.name | The Git repository object name we are referencing. To create an implicit dependency, we reference a named value from the Git repository creation script. |
# Create Tanzu Mission Control kustomization with attached set as default value.
resource "tanzu-mission-control_kustomization" "create_cluster_group_kustomization" {
  name = "my-demo-app" # Required

  namespace_name = "tanzu-continuousdelivery-resources" #Required

  scope {
    cluster_group {
      name = tanzu-mission-control_cluster_group.create_cluster_group.name # Required
    }
  }

  meta {
    description = "my demo app"
    labels      = { "owner" : "aullah" }
  }

  spec {
    path             = "/deployment" # Required
    prune            = "false"
    interval         = "5m" # Default: 5m
    target_namespace = "default"
    source {
      name      = tanzu-mission-control_git_repository.create_cluster_group_git_repository.name      # Required
      namespace = "tanzu-continuousdelivery-resources" # Required
    }
  }
}
To summarize what these two scripts will do. It will create our CD resources on the Cluster Group level within TMC. This will trigger a FluxCD installation on each cluster in the Cluster Group. It will also apply the FluxCD GitRepository and Kustomization custom resource. FluxCD will then do its magic and continuously synchronize the content from our repository with every cluster. This is pretty cool, but we still need a Kubernetes cluster in our Cluster Group, so let’s move on to the next step.
6. Create a Terraform script for EKS deployments
We can follow the EKS guide from the TMC Terraform provider to create a script with the correct parameters. We must reuse the IDs (subnet, security group) and ARN roles (control-plane, worker) created during our Cloud Formation Stack runs. Here are some of the parameters you need to change according to your environment:
| Specify the region where you want your EKS cluster deployed (where you created your VPC). | Description |
|---|---|
| resource.credential_name | The TMC credential name we created while connecting our AWS account with TMC. |
| resource.region | Specify the region where you want your EKS cluster to be deployed (the region in which you created your VPC). |
| resource.name | Specify the name of your EKS cluster. |
| resource.ready_wait_timout | Wait time for cluster creation to finish. |
| resource.spec.cluster_group | Specify the name of the TMC Cluster Group. In this example, we use a reference to a named value from the Cluster Group creation script to create an implicit dependency. |
| resource.spec.config.role_arn | The control-plane role ARN we have created and identified at the beginning. |
| resource.spec.config.kubernetes_version | Define one of the support Kubernetes versions for your EKS cluster. |
| resource.spec.config.vpc.security_groups | AWS security group(s) that have been created as part of our VPC creation. |
| resource.spec.config.vpc.subnet_ids | AWS subnet IDs that have been created during the VPC creation. |
| resource.spec.nodepool.spec.role_arn | The worker role ARN that we created and identified at the beginning. |
| resource.spec.nodepool.spec.ami_type | Specify the AMI type of your choice. |
| resource.spec.nodepool.spec.root_disk_size | The root disk size for your nodes in GiB. |
| resource.spec.nodepool.spec.subnet_ids | AWS subnet IDs that have been created during the VPC creation. |
| resource.spec.nodepool.spec.scaling_config | Desired node count config and min-max settings. |
| resource.spec.nodepool.spec.instance_types | AWS instance type for your worker nodes. |
I recommend double-checking all available parameters and adding or changing the script according to your needs. A complete list can be found here.
# Create a Tanzu Mission Control AWS EKS cluster entry
resource "tanzu-mission-control_ekscluster" "tf_eks_cluster" {
  credential_name = "aullah-aws-eks-tmc"          // Required
  region          = "us-west-2"         // Required
  name            = "aullah-eks-cl1" // Required

  ready_wait_timeout = "45m" // Wait time for cluster operations to finish (default: 30m).

  meta {
    description = "aullah eks cluster"
    labels      = { "owner" : "aullah" }
  }

  spec {
    cluster_group = tanzu-mission-control_cluster_group.create_cluster_group.name // Default: default

    config {
      role_arn = "arn:aws:iam::xxxxxxxxxxxx:role/control-plane.<GeneratedTemplateID>.eks.tmc.cloud.vmware.com" // Required, forces new

      kubernetes_version = "1.27" // Required
      tags               = { "tagkey" : "tagvalue" }

      kubernetes_network_config {
        service_cidr = "10.100.0.0/16" // Forces new
      }

      logging {
        api_server         = false
        audit              = false
        authenticator      = false
        controller_manager = false
        scheduler          = false
      }

      vpc { // Required
        enable_private_access = true
        enable_public_access  = true
        public_access_cidrs = [
          "0.0.0.0/0",
        ]
        security_groups = [ // Forces new
          "sg-xxxxxxxxxxxx",
        ]
        subnet_ids = [ // Forces new
          "subnet-xxxxxxxxxxxx1",
          "subnet-xxxxxxxxxxxx2",
          "subnet-xxxxxxxxxxxx3",
          "subnet-xxxxxxxxxxxx4",
        ]
      }
    }

    nodepool {
      info {
        name        = "fist-np"
        description = "first eks nodepool"
      }

      spec {
        role_arn = "arn:aws:iam::xxxxxxxxxxxx:role/worker.<GeneratedTemplateID>.eks.tmc.cloud.vmware.com" // Required

        ami_type       = "AL2_x86_64"
        capacity_type  = "ON_DEMAND"
        root_disk_size = 30 // Default: 20GiB
        tags           = { "nptag" : "nptagvalue9" }
        node_labels    = { "nplabelkey" : "nplabelvalue" }

        subnet_ids = [ // Required
          "subnet-xxxxxxxxxxxx1",
          "subnet-xxxxxxxxxxxx2",
          "subnet-xxxxxxxxxxxx3",
          "subnet-xxxxxxxxxxxx4",
        ]

        scaling_config {
          desired_size = 3
          max_size     = 3
          min_size     = 2
        }

        update_config {
          max_unavailable_nodes = "1"
        }

        instance_types = [
          "m3.large",
        ]

      }
    }
  }
}
As mentioned above, many of these input parameters should instead be declared as variables to make the script reusable. Nevertheless, for the sake of simplicity, I just entered them directly, so let’s run it!
Let’s run it!
We should have all the necessary Terraform scripts in our working directory and can finally test if everything works as expected. 🥁🥁🥁 We simply have to execute the “terraform plan” command to create and review the execution plan, followed by a “terraform apply” if things look good.
➜ terraform plan -out tfplan.out

Terraform used the selected providers to generate the following execution plan. Resource actions are indicated with the following symbols:
  + create

Terraform will perform the following actions:

  # tanzu-mission-control_cluster_group.create_cluster_group will be created
  + resource "tanzu-mission-control_cluster_group" "create_cluster_group" {
      + id   = (known after apply)
      + name = "aullah-demo-clgrp"

      + meta {
          + annotations      = (known after apply)
          + description      = "Create cluster group through terraform"
          + labels           = {
              + "owner" = "aullah"
            }
          + resource_version = (known after apply)
          + uid              = (known after apply)
        }
    }

  # tanzu-mission-control_ekscluster.tf_eks_cluster will be created
  + resource "tanzu-mission-control_ekscluster" "tf_eks_cluster" {

...
...
...

Plan: 4 to add, 0 to change, 0 to destroy.

────────────────────────────────────────────────────────────────────────────────────────────────────────────────────────────────────────────────────────────

Saved the plan to: tfplan.out

To perform exactly these actions, run the following command to apply:
    terraform apply "tfplan.out"

➜ terraform apply tfplan.out
tanzu-mission-control_cluster_group.create_cluster_group: Creating...
tanzu-mission-control_cluster_group.create_cluster_group: Creation complete after 6s [id=cg:01HBQRCE7XKH4HXSVXSD1WNACK]
tanzu-mission-control_git_repository.create_cluster_group_git_repository: Creating...
tanzu-mission-control_ekscluster.tf_eks_cluster: Creating...
tanzu-mission-control_git_repository.create_cluster_group_git_repository: Creation complete after 1s [id=cggitrepo:01HBQRCFAT2YHQE4Y649YJJW3F]
tanzu-mission-control_kustomization.create_cluster_group_kustomization: Creating...
tanzu-mission-control_kustomization.create_cluster_group_kustomization: Creation complete after 2s [id=cgks:01HBQRCGP95PKG8D1KQDVAS488]
tanzu-mission-control_ekscluster.tf_eks_cluster: Still creating... [10s elapsed]
tanzu-mission-control_ekscluster.tf_eks_cluster: Still creating... [20s elapsed]
tanzu-mission-control_ekscluster.tf_eks_cluster: Still creating... [30s elapsed]
...
...
...
tanzu-mission-control_ekscluster.tf_eks_cluster: Still creating... [5m40s elapsed]
tanzu-mission-control_ekscluster.tf_eks_cluster: Still creating... [5m50s elapsed]
tanzu-mission-control_ekscluster.tf_eks_cluster: Still creating... [6m0s elapsed]
tanzu-mission-control_ekscluster.tf_eks_cluster: Creation complete after 6m6s [id=c:01HBQRCF32D437SAFEFEM8AS9D]

Apply complete! Resources: 4 added, 0 changed, 0 destroyed.
That looks good. Let’s see if the EKS cluster got deployed and the TMC configuration is in place.
Let’s check the results!
The TMC Cluster Group should be available instantly, and we should see the EKS cluster being created and listed as part of the group.


The Git repository and the Kustomization should be visible under the “Add-ons” tab of the Cluster Group.


Nevertheless, as the cluster is not ready yet, the “Cluster sync status” will still show “Enabling”.

Once the EKS cluster is ready, it will install the FluxCD packages and continuously sync our content according to our CD configuration. Finally, the “Cluster sync status” will change to “Enabled”.


In the Namespaces section of TMC, we can check if our example app has been deployed.

We can now get kubectl access to the EKS cluster by using the TMC UI or the tanzu cli. We will work with the tanzu cli to check the created resources via kubectl. For this to work, you need to have a TMC context configured and working as mentioned here.
First, we will gather the kubeconfig file and switch our kubectl context via the following commands:
➜  ~ tanzu mission-control cluster kubeconfig get <your-cluster-name-as-shown-in-tmc> -m eks -p eks >> .kube/config
➜  ~ k config use-context <your-cluster-name-as-shown-in-tmc>
Switched to context "<your-cluster-name-as-shown-in-tmc>".
Let’s have a final look at our test app that should be deployed on our EKS cluster.
➜  ~ k get pods,svc
NAME                                     READY   STATUS    RESTARTS   AGE
pod/vmware-explore-app-f95dfbfb9-5b82m   1/1     Running   0          65m
pod/vmware-explore-app-f95dfbfb9-hq857   1/1     Running   0          65m

NAME                         TYPE           CLUSTER-IP     EXTERNAL-IP                                                              PORT(S)        AGE
service/kubernetes           ClusterIP      10.100.0.1     <none>                                                                   443/TCP        100m
service/vmware-explore-app   LoadBalancer   10.100.7.124   a0200c87768344e129eb75ea85907934-xxxxxxxx.us-west-2.elb.amazonaws.com   80:31265/TCP   65m
We can also reach the test app via the assigned LoadBalancer URL.

Great, our test app is deployed via CD and available on our EKS cluster. Any changes I commit against the app’s Git repository will be automatically synced with my cluster.
Summary
Combining Terraform or IaC with the TMC GitOps capabilities makes a lot of sense and helps DevOps teams automate their daily tasks, such as cluster provisioning, cluster configuration, or even workload deployments. Grouping Kubernetes clusters in organizational entities and using CD on the TMC Cluster Group further reduces the effort to ensure equal configuration for multiple clusters.
Additionally, the TMC Terrafrom provider offers much more than we have covered in this post. Security policies, access policies, network policies, and more can be created on various levels of TMC’s hierarchical policy structure.
At this point, you might think, is it possible to use GitOps for my Terraform scripts too? The answer is yes. There is a Terraform controller available from the FluxCD project that does exactly that.
Sources
- State of Kubernetes Report 2023
- TMC Terraform provider docs
- TMC Terraform provider GitHub page
- TMC Terraform provider docs – EKS guide
- TMC Terraform provider docs – Git Repository
- TMC Terraform provider docs – Kustomization
- Tanzu Mission Control landing page
- AWS EKS landing page
- AWS EC2 instance types
- AWS ARN documentation
- AWS Cloud Formation stack documentation
- AWS CLI installation documentation
- TMC EKS documentation
- TMC Tanzu CLI documentation
- TMC policy structure documentation
- TMC Cluster Group documentation
- TMC Continuous Delivery documentation
- TMC Log in documentation
- TMC EKS VPC documentation
- FluxCD landing page
- FluxCD docs – GitRepository
- FluxCD docs – Kustomization
- Terraform documentation – reference named values
- Terraform documentation – apply
- Terraform documentation – plan
- Terraform documentation – tfvars
- Terraform CLI installation
- Visual Studio Code – HashiCorp Terraform extension
- How to GitOps your Terraform

Leave a comment