
Intro
Kubernetes reached a brought adoption across various industries over the last years. Surveys such as the State of Kubernetes 2023 report show that enterprises achieve great business and operational benefits from using Kubernetes. However, we also see that providing the right level of security can be challenging in the fast-moving Kubernetes and Cloud-Native landscape.

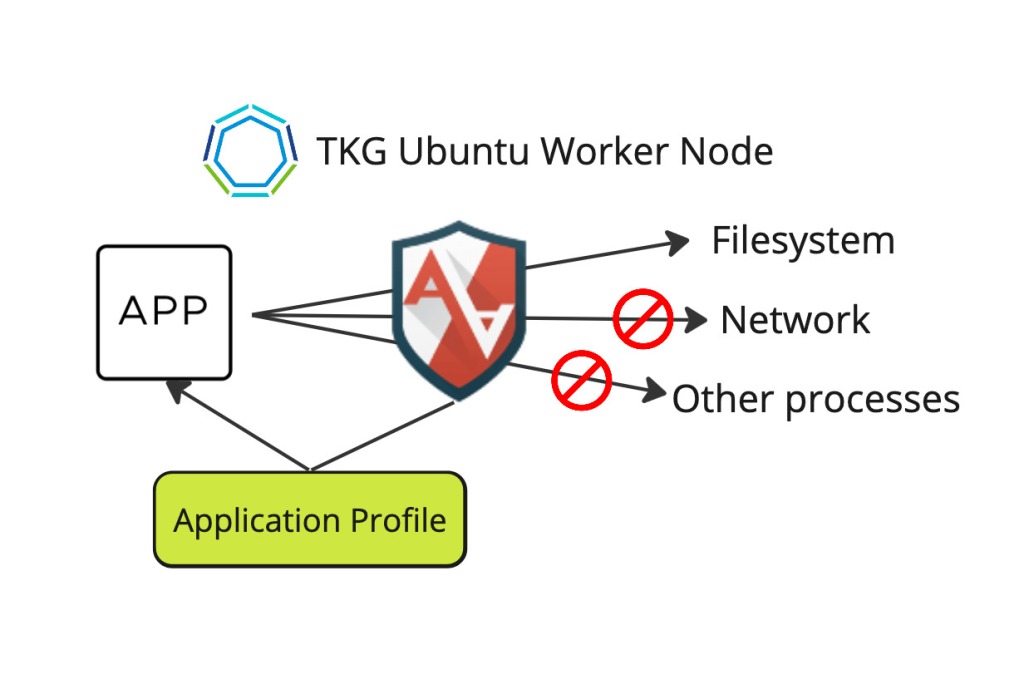
In this blog post, I will demonstrate how to use AppArmor with Tanzu Kubernetes Grid (TKG) to protect your Kubernetes Nodes and workloads by enforcing good application behavior.
AppArmor
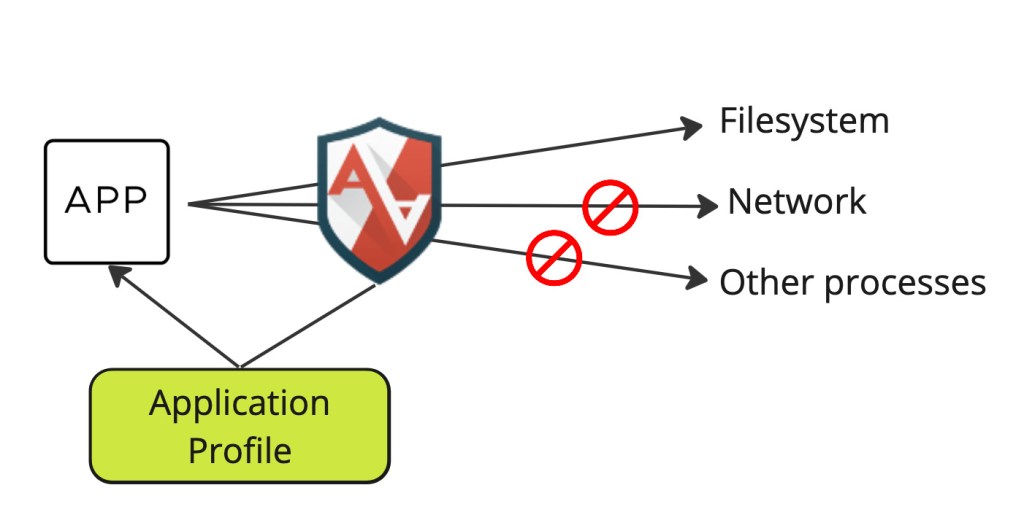
Let us start with a bit of explanation and history around AppArmor. AppArmor is a security module included in the Linux kernel since version 2.6.36. It allows or forbids access to system resources, such as network, filesystem, or other processes, based on application profiles. This prevents application flaws from being exploited.
AppArmor has been around for quite some time and was initially known under the name SubDomain developed by Immunix from 1998 onwards. In 2005 Immunix was acquired by Novell, and SubDomain was rebranded to AppArmor. Suse was also part of Novell and eventually became the trademark owner. Since 2009 it has been maintained and further developed by the Canonical team. AppArmor became a default package in Ubuntu 7.10. Since then, more application profiles have been added to secure the operating system.
AppArmor Profiles
AppArmor profiles are simple text files that define mandatory access control (MAC) policies for our applications and are stored under /etc/apparmor.d/. We can control access to the following system resources, capabilities, and processes:
- Files
- Linux capabilities
- Network
- Mount, remount, and umount
- pivot_root
- ptrace
- signal
- DBus
- Unix domain sockets
AppArmor profiles can be put in three different modes:
- Enforce = Process cannot escape
- Complain = Process can escape but will be logged
- Unconfined = Process can escape
An empty profile looks like the following example:
# AppArmor policy for appxyz
# ###Author and copyright###
# ###Comments###

#include <tunables/global>

# No template variables specified

"/usr/bin/appxyz" {
#include <abstractions/base>

# No abstractions specified

# No policy groups specified

# No read paths specified

# No write paths specified
}
AppArmor will deny access to resources if no access rule has been explicitly specified in the profile. If the application tries to access a resource with no matching rule, it will be denied and logged. Read the following documentation to learn more about what and how to specify access rules in AppArmore profiles. Luckily, there is a more convenient way to create profiles than writing them by hand, which we will cover in the next section.
How to build Profiles
We need a Linux machine with AppArmor installed and available to build profiles. In our case, we are using an Ubuntu TKG Worker Node for it. However, a standalone Ubuntu VM might be better in a real-world example, as the TKG Worker Node can get recreated during cluster lifecycle operations.
First, we check if we have the necessary tools to build AppArmor profiles installed. For example, we want to use the command “aa-genprof” to generate new profiles. If that is not available, you can run the following command to install the apparmor-utils:
apt-get update && apt-get install apparmor-utils
Once the required tools are installed, we can use aa-genprof to create a profile. In this simple example, we will create a profile for curl. We can choose whether to scan the system logs for AppArmor events for our application by pressing “S” or to create an empty profile by pressing the “F” key. In this example, we press “F” and check if a curl profile has been created under “/etc/apparmor.d/usr.local.bin.curl”. Additionally, we verify that the profile is loaded with the “aa-status” command.
root@tkg-ubuntu...1:~# aa-genprof curl
	not a dynamic executable
Writing updated profile for /usr/local/bin/curl.
Setting /usr/local/bin/curl to complain mode.

Before you begin, you may wish to check if a
profile already exists for the application you
wish to confine. See the following wiki page for
more information:
https://gitlab.com/apparmor/apparmor/wikis/Profiles

Profiling: /usr/local/bin/curl

Please start the application to be profiled in
another window and exercise its functionality now.

Once completed, select the "Scan" option below in
order to scan the system logs for AppArmor events.

For each AppArmor event, you will be given the
opportunity to choose whether the access should be
allowed or denied.

[(S)can system log for AppArmor events] / (F)inish
Setting /usr/local/bin/curl to enforce mode.

Reloaded AppArmor profiles in enforce mode.

Please consider contributing your new profile!
See the following wiki page for more information:
https://gitlab.com/apparmor/apparmor/wikis/Profiles

Finished generating profile for /usr/local/bin/curl.
root@tkg-ubuntu...1:~# cat /etc/apparmor.d/usr.local.bin.curl
# Last Modified: Wed Jun 14 12:45:53 2023
#include <tunables/global>

/usr/local/bin/curl {
  #include <abstractions/base>

  /usr/local/bin/curl mr,

}
root@tkg-ubuntu...1:~# aa-status
apparmor module is loaded.
14 profiles are loaded.
14 profiles are in enforce mode.
   /usr/bin/man
   /usr/lib/NetworkManager/nm-dhcp-client.action
   /usr/lib/NetworkManager/nm-dhcp-helper
   /usr/lib/connman/scripts/dhclient-script
   /usr/local/bin/curl
   /usr/sbin/chronyd
   /usr/sbin/tcpdump
   /{,usr/}sbin/dhclient
   cri-containerd.apparmor.d
   lsb_release
   man_filter
   man_groff
   nvidia_modprobe
   nvidia_modprobe//kmod
0 profiles are in complain mode.
13 processes have profiles defined.
13 processes are in enforce mode.
   /usr/sbin/chronyd (1164)
   /usr/sbin/chronyd (1165)
   /usr/bin/registry (2562) cri-containerd.apparmor.d
   /csi-node-driver-registrar (2989) cri-containerd.apparmor.d
   /usr/bin/bash (3144) cri-containerd.apparmor.d
   /usr/sbin/ovsdb-server (3193) cri-containerd.apparmor.d
   /usr/sbin/ovsdb-server (3194) cri-containerd.apparmor.d
   /usr/sbin/ovs-vswitchd (3245) cri-containerd.apparmor.d
   /usr/sbin/ovs-vswitchd (3246) cri-containerd.apparmor.d
   /livenessprobe (3522) cri-containerd.apparmor.d
   /carvel-secretgen-controller (3738) cri-containerd.apparmor.d
   /metrics-server (3774) cri-containerd.apparmor.d
   /usr/bin/sleep (6189) cri-containerd.apparmor.d
0 processes are in complain mode.
0 processes are unconfined but have a profile defined.
If we execute curl now, we can see that it is not working anymore as it tries to resolve our URL, but AppArmor will prevent access as we haven’t specified access rules in our profile and generate events in the system log. We will now use the “aa-logprof” command to scan the system logs and update our curl profile.
root@tkg-ubuntu...1:~# curl beyondelastic.com
curl: (6) Could not resolve host: beyondelastic.com
root@tkg-ubuntu...1:~# cat /var/log/audit/audit.log | grep DENIED
type=AVC msg=audit(1686754033.809:151416): apparmor="DENIED" operation="open" profile="/usr/local/bin/curl" name="/etc/ssl/openssl.cnf" pid=33455 comm="curl" requested_mask="r" denied_mask="r" fsuid=0 ouid=0
type=AVC msg=audit(1686754033.813:151417): apparmor="DENIED" operation="open" profile="/usr/local/bin/curl" name="/etc/passwd" pid=33455 comm="curl" requested_mask="r" denied_mask="r" fsuid=0 ouid=0
type=AVC msg=audit(1686754033.817:151418): apparmor="DENIED" operation="create" profile="/usr/local/bin/curl" pid=33455 comm="curl" family="inet6" sock_type="dgram" protocol=0 requested_mask="create" denied_mask="create"
type=AVC msg=audit(1686754033.817:151419): apparmor="DENIED" operation="open" profile="/usr/local/bin/curl" name="/etc/hosts" pid=33455 comm="curl" requested_mask="r" denied_mask="r" fsuid=0 ouid=0
type=AVC msg=audit(1686754033.817:151420): apparmor="DENIED" operation="open" profile="/usr/local/bin/curl" name="/run/systemd/resolve/stub-resolv.conf" pid=33455 comm="curl" requested_mask="r" denied_mask="r" fsuid=0 ouid=101
type=AVC msg=audit(1686754033.817:151421): apparmor="DENIED" operation="create" profile="/usr/local/bin/curl" pid=33455 comm="curl" family="inet" sock_type="dgram" protocol=0 requested_mask="create" denied_mask="create"
root@tkg-ubuntu...1:~# aa-logprof
Reading log entries from /var/log/audit/audit.log.
Updating AppArmor profiles in /etc/apparmor.d.
Enforce-mode changes:

Profile:  /usr/local/bin/curl
Path:     /etc/ssl/openssl.cnf
New Mode: owner r
Severity: 2

 [1 - #include <abstractions/openssl>]
  2 - #include <abstractions/ssl_keys>
  3 - owner /etc/ssl/openssl.cnf r,
(A)llow / [(D)eny] / (I)gnore / (G)lob / Glob with (E)xtension / (N)ew / Audi(t) / (O)wner permissions off / Abo(r)t / (F)inish
Adding #include <abstractions/openssl> to profile.

Profile:  /usr/local/bin/curl
Path:     /etc/passwd
New Mode: owner r
Severity: 4

 [1 - #include <abstractions/nameservice>]
  2 - owner /etc/passwd r,
(A)llow / [(D)eny] / (I)gnore / (G)lob / Glob with (E)xtension / (N)ew / Audi(t) / (O)wner permissions off / Abo(r)t / (F)inish
Adding #include <abstractions/nameservice> to profile.

= Changed Local Profiles =

The following local profiles were changed. Would you like to save them?

 [1 - /usr/local/bin/curl]
(S)ave Changes / Save Selec(t)ed Profile / [(V)iew Changes] / View Changes b/w (C)lean profiles / Abo(r)t
Writing updated profile for /usr/local/bin/curl.
root@tkg-ubuntu...1:~# cat /etc/apparmor.d/usr.local.bin.curl
# Last Modified: Wed Jun 14 15:08:42 2023
#include <tunables/global>

/usr/local/bin/curl {
  #include <abstractions/base>
  #include <abstractions/nameservice>
  #include <abstractions/openssl>

  /usr/local/bin/curl mr,

}
root@tkg-ubuntu...1:~# curl beyondelastic.com
<html>
<head><title>301 Moved Permanently</title></head>
<body>
<center><h1>301 Moved Permanently</h1></center>
<hr><center>nginx</center>
</body>
</html>
As we can see, the profile now includes abstractions for name service and OpenSSL, which is required for curl to work. If we execute a curl command with the updated AppArmor profile, everything works as expected.
How to distribute Profiles
AppArmor profiles must be available on every Worker Node in the TKG Workload Cluster. There are different ways to distribute our profiles to our Worker Nodes. The easiest way is to use a DaemonSet that runs on each Node and writes the profiles to the local file system. This is also known as the AppArmor Loader, and you can find an example manifest here. However, the AppArmor Loader Pod must run in privileged mode, which is not ideal from a security perspective but probably the most convenient way to start.
Another way is to create an SSH script that connects to every Worker Node and stores the profile locally using the apparmor_parser command. But with automated lifecycle and immutable Nodes, the IP address of the Nodes might change, and the script needs to be executed periodically or post upgrade, scale, or self-healing operations. The VMware Event Broker Appliance project (VEBA) could be a solution to react to certain Kubernetes API events. Here is an example script for “vSphere with Tanzu” that you can use at your own risk:
#Script requires sshpass, kubectl, openssl(base64)
#Make sure to loggin to the Supervisor cluster via "kubectl vsphere login ..." and use the correct Supervisor Cluster kubectl context via "kubectl config use-context ..."
#This script works on a per cluster basis, TKG cluster name and namespace need to be defined!

NAMESPACE=ese
CLUSTER=tkg-ubuntu

#Script starts here
SSHPASS=$(kubectl get secret $CLUSTER-ssh-password -n $NAMESPACE -o jsonpath='{.items[*]}{.data.ssh-passwordkey}' | base64 -d)
NODES=$(kubectl get virtualmachines -n $NAMESPACE --selector=capw.vmware.com/cluster.name=$CLUSTER -o json | jq -r '.items[] | select(.metadata.annotations."vsphere-cluster-module-group" | test("workers")).status.vmIp')

for NODE in ${NODES[*]}; do sshpass -p $SSHPASS ssh vmware-system-user@$NODES 'sudo apparmor_parser -q <<EOF
#include <tunables/global>

profile k8s-apparmor-example-deny-write flags=(attach_disconnected) {
  #include <abstractions/base>

  file,

  # Deny all file writes.
  deny /** w,
}
EOF'
done
Lastly, an option could be customizing the Ubuntu Node image via the “vSphere Tanzu Kubernetes Grid Image Builder” introduced in vSphere with Tanzu 8 Update1. I haven’t played with it, but I will try it soon.
AppArmor and TKG
How can we make use of AppArmor with TKG? VMware ships Ubuntu Kubernetes Node images with every release of TKG. We must create an Ubuntu-based TKG Workload Cluster and ssh into one of the Worker Nodes to see that AppAmor is running and which profiles are available. If you want to know how to ssh into a TKG Worker Node, look at the documentation here. Per default, 13 profiles are loaded and in enforce mode.
vmware-system-user@tkg-ubuntu-node-pool-1-4d69x-7cf6bd568-b8j6l:~$ sudo -i
root@tkg-ubuntu-node-pool-1-4d69x-7cf6bd568-b8j6l:~# aa-status
apparmor module is loaded.
13 profiles are loaded.
13 profiles are in enforce mode.
   /usr/bin/man
   /usr/lib/NetworkManager/nm-dhcp-client.action
   /usr/lib/NetworkManager/nm-dhcp-helper
   /usr/lib/connman/scripts/dhclient-script
   /usr/sbin/chronyd
   /usr/sbin/tcpdump
   /{,usr/}sbin/dhclient
   cri-containerd.apparmor.d
   lsb_release
   man_filter
   man_groff
   nvidia_modprobe
   nvidia_modprobe//kmod
0 profiles are in complain mode.
13 processes have profiles defined.
13 processes are in enforce mode.
   /usr/sbin/chronyd (1177)
   /usr/sbin/chronyd (1178)
   /usr/bin/registry (2569) cri-containerd.apparmor.d
   /usr/bin/bash (3301) cri-containerd.apparmor.d
   /usr/sbin/ovsdb-server (3351) cri-containerd.apparmor.d
   /usr/sbin/ovsdb-server (3352) cri-containerd.apparmor.d
   /usr/sbin/ovs-vswitchd (3403) cri-containerd.apparmor.d
   /usr/sbin/ovs-vswitchd (3404) cri-containerd.apparmor.d
   /livenessprobe (3715) cri-containerd.apparmor.d
   /csi-node-driver-registrar (3863) cri-containerd.apparmor.d
   /carvel-secretgen-controller (3901) cri-containerd.apparmor.d
   /metrics-server (3938) cri-containerd.apparmor.d
   /usr/bin/sleep (60451) cri-containerd.apparmor.d
0 processes are in complain mode.
0 processes are unconfined but have a profile defined.
In this example, we will use the AppArmor Loader to distribute an AppArmore profile to our TKG cluster nodes. The loader consists of a Kubernetes ConfigMap and a DaemonSet. The ConfigMap will hold the content of the profile we want to distribute to our Worker Nodes under the data section. In this example, we are using a profile for containerized Nginx:
# An example ConfigMap demonstrating how profiles can be stored as Kubernetes objects, and loaded by
# the apparmor-loader DaemonSet.

apiVersion: v1
kind: ConfigMap
metadata:
  name: apparmor-profiles
  namespace: apparmor
data:
  # Filename k8s-nginx maps to the definition of the nginx profile.
  k8s-nginx: |-
    #include <tunables/global>
    # From https://github.com/jfrazelle/bane/blob/master/docker-nginx-sample
    profile k8s-nginx flags=(attach_disconnected,mediate_deleted) {
      #include <abstractions/base>
      network inet tcp,
      network inet udp,
      network inet icmp,
      deny network raw,
      deny network packet,
      file,
      umount,
      deny /bin/** wl,
      deny /boot/** wl,
      deny /dev/** wl,
      deny /etc/** wl,
      deny /home/** wl,
      deny /lib/** wl,
      deny /lib64/** wl,
      deny /media/** wl,
      deny /mnt/** wl,
      deny /opt/** wl,
      deny /proc/** wl,
      deny /root/** wl,
      deny /sbin/** wl,
      deny /srv/** wl,
      deny /tmp/** wl,
      deny /sys/** wl,
      deny /usr/** wl,
      audit /** w,
      /var/run/nginx.pid w,
      /usr/sbin/nginx ix,
      deny /bin/dash mrwklx,
      deny /bin/sh mrwklx,
      deny /usr/bin/top mrwklx,
      capability chown,
      capability dac_override,
      capability setuid,
      capability setgid,
      capability net_bind_service,
      deny @{PROC}/{*,**^[0-9*],sys/kernel/shm*} wkx,
      deny @{PROC}/sysrq-trigger rwklx,
      deny @{PROC}/mem rwklx,
      deny @{PROC}/kmem rwklx,
      deny @{PROC}/kcore rwklx,
      deny mount,
      deny /sys/[^f]*/** wklx,
      deny /sys/f[^s]*/** wklx,
      deny /sys/fs/[^c]*/** wklx,
      deny /sys/fs/c[^g]*/** wklx,
      deny /sys/fs/cg[^r]*/** wklx,
      deny /sys/firmware/efi/efivars/** rwklx,
      deny /sys/kernel/security/** rwklx,
    }
The Loader DaemonSet will mount the ConfigMap, write the profile to every Worker Node in the cluster, and check for new profiles every 30 seconds. Unfortunately, it will not unload or remove deleted profiles.
# The example DaemonSet demonstrating how the profile loader can be deployed onto a cluster to
# automatically load AppArmor profiles from a ConfigMap.

apiVersion: apps/v1
kind: DaemonSet
metadata:
  name: apparmor-loader
  # Namespace must match that of the ConfigMap.
  namespace: apparmor
  labels:
    daemon: apparmor-loader
spec:
  selector:
    matchLabels:
      daemon: apparmor-loader
  template:
    metadata:
      name: apparmor-loader
      labels:
        daemon: apparmor-loader
    spec:
      containers:
      - name: apparmor-loader
        image: google/apparmor-loader:latest
        args:
          # Tell the loader to pull the /profiles directory every 30 seconds.
          - -poll
          - 30s
          - /profiles
        securityContext:
          # The loader requires root permissions to actually load the profiles.
          privileged: true
        volumeMounts:
        - name: sys
          mountPath: /sys
          readOnly: true
        - name: apparmor-includes
          mountPath: /etc/apparmor.d
          readOnly: true
        - name: profiles
          mountPath: /profiles
          readOnly: true
      volumes:
      # The /sys directory must be mounted to interact with the AppArmor module.
      - name: sys
        hostPath:
          path: /sys
      # The /etc/apparmor.d directory is required for most apparmor include templates.
      - name: apparmor-includes
        hostPath:
          path: /etc/apparmor.d
      # Map in the profile data.
      - name: profiles
        configMap:
          name: apparmor-profiles
Let’s deploy the AppArmor Loader to our TKG Cluster. Ensure you have configured your Pod Security Policy accordingly if using vSphere with Tanzu.
(⎈ |tkg-ubuntu:default)➜ k create ns apparmor
namespace/apparmor created
(⎈ |tkg-ubuntu:default)➜ k apply -f loader-configmap.yaml
configmap/apparmor-profiles created
(⎈ |tkg-ubuntu:default)➜ k apply -f loader-daemon.yaml
daemonset.apps/apparmor-loader created
(⎈ |tkg-ubuntu:default)➜  loader k get configmap -n apparmor
NAME                DATA   AGE
apparmor-profiles   1      30s
kube-root-ca.crt    1      38s
(⎈ |tkg-ubuntu:default)➜ k get ds -n apparmor
NAME              DESIRED   CURRENT   READY   UP-TO-DATE   AVAILABLE   NODE SELECTOR   AGE
apparmor-loader   1         1         1       1            1           <none>          23m
(⎈ |tkg-ubuntu:default)➜ k get pods -n apparmor
NAME                    READY   STATUS    RESTARTS   AGE
apparmor-loader-q4mqq   1/1     Running   0          20m
(⎈ |tkg-ubuntu:default)➜ k -n apparmor logs apparmor-loader-q4mqq
I0616 15:30:09.577866       1 loader.go:97] Polling /profiles every 30s
I0616 15:30:09.780900       1 loader.go:197] Loading profiles from /profiles/k8s-nginx:
Addition succeeded for "k8s-nginx".
I0616 15:30:09.781026       1 loader.go:101] Successfully loaded profiles: [k8s-nginx]
The AppArmor DeamonSet has been deployed and successfully loaded the profile to our TKG Worker Node. We can ssh into the Worker Node and double-check if the profile has been loaded via the aa-status command.
vmware-system-user@tkg-ubuntu-node-pool-1-4d69x-7cf6bd568-vr7fh:~$ sudo -i
root@tkg-ubuntu-node-pool-1-4d69x-7cf6bd568-vr7fh:~# aa-status
apparmor module is loaded.
14 profiles are loaded.
14 profiles are in enforce mode.
   /usr/bin/man
   /usr/lib/NetworkManager/nm-dhcp-client.action
   /usr/lib/NetworkManager/nm-dhcp-helper
   /usr/lib/connman/scripts/dhclient-script
   /usr/sbin/chronyd
   /usr/sbin/tcpdump
   /{,usr/}sbin/dhclient
   cri-containerd.apparmor.d
   k8s-nginx
   lsb_release
   man_filter
   man_groff
   nvidia_modprobe
   nvidia_modprobe//kmod
0 profiles are in complain mode.
13 processes have profiles defined.
13 processes are in enforce mode.
   /usr/sbin/chronyd (1174)
   /usr/sbin/chronyd (1175)
   /usr/bin/registry (2589) cri-containerd.apparmor.d
   /csi-node-driver-registrar (3022) cri-containerd.apparmor.d
   /usr/bin/bash (3170) cri-containerd.apparmor.d
   /usr/sbin/ovsdb-server (3221) cri-containerd.apparmor.d
   /usr/sbin/ovsdb-server (3222) cri-containerd.apparmor.d
   /usr/sbin/ovs-vswitchd (3273) cri-containerd.apparmor.d
   /usr/sbin/ovs-vswitchd (3274) cri-containerd.apparmor.d
   /carvel-secretgen-controller (3698) cri-containerd.apparmor.d
   /metrics-server (3739) cri-containerd.apparmor.d
   /livenessprobe (3774) cri-containerd.apparmor.d
   /usr/bin/sleep (15625) cri-containerd.apparmor.d
0 processes are in complain mode.
0 processes are unconfined but have a profile defined.
Great 14 profiles loaded! Our AppArmor profile for Nginx is loaded and available on our TKG Worker Node. In the next section, we will look at how to use an AppArmor profile for a Kubernetes workload.
AppArmor and Kubernetes
Now that we have a rough idea of AppArmor and how to distribute profiles to our Worker Nodes, we can use it to protect containerized workloads on Kubernetes. It is as simple as specifying AppArmor profiles via annotations for the Containers in your application manifest.
apiVersion: v1
kind: Pod
metadata:
  name: hello-apparmor-2
  annotations:
    container.apparmor.security.beta.kubernetes.io/hello: localhost/k8s-apparmor-example-allow-write
spec:
  containers:
  - name: hello
    image: busybox:1.28
    command: [ "sh", "-c", "echo 'Hello AppArmor!' && sleep 1h" ]
See the following tutorial on the Kubernetes documentation page on restricting access to resources with AppArmor.
AppArmor Workload Test
We will now use our AppAmor profile to protect a workload on our TKG Cluster. But before we do so, I will show you what we can do on an Nginx pod without an AppArmor profile. We are going to use a very simple Nginx pod for our test.
apiVersion: v1
kind: Pod
metadata:
  labels:
    run: nginx
  name: nginx
spec:
  containers:
  - image: nginx
    name: nginx
  imagePullSecrets:
  - name: regcred
  dnsPolicy: ClusterFirst
  restartPolicy: Always
We will create the pod and start an interactive shell session on the Nginx container to manipulate specific resources. We will write to the root folder and modify “/etc/passwd”.
(⎈ |tkg-ubuntu:default)➜  apparmor k apply -f pod.yaml
pod/nginx created
(⎈ |tkg-ubuntu:default)➜  apparmor k get pods
NAME    READY   STATUS    RESTARTS   AGE
nginx   1/1     Running   0          111s
(⎈ |tkg-ubuntu:default)➜  apparmor k exec -it nginx -- bash
root@nginx:/# touch /root/test
root@nginx:/# ls /root/
test
root@nginx:/# echo aullah >> /etc/passwd
root@nginx:/# cat /etc/passwd
root:x:0:0:root:/root:/bin/bash
daemon:x:1:1:daemon:/usr/sbin:/usr/sbin/nologin
bin:x:2:2:bin:/bin:/usr/sbin/nologin
sys:x:3:3:sys:/dev:/usr/sbin/nologin
sync:x:4:65534:sync:/bin:/bin/sync
games:x:5:60:games:/usr/games:/usr/sbin/nologin
man:x:6:12:man:/var/cache/man:/usr/sbin/nologin
lp:x:7:7:lp:/var/spool/lpd:/usr/sbin/nologin
mail:x:8:8:mail:/var/mail:/usr/sbin/nologin
news:x:9:9:news:/var/spool/news:/usr/sbin/nologin
uucp:x:10:10:uucp:/var/spool/uucp:/usr/sbin/nologin
proxy:x:13:13:proxy:/bin:/usr/sbin/nologin
www-data:x:33:33:www-data:/var/www:/usr/sbin/nologin
backup:x:34:34:backup:/var/backups:/usr/sbin/nologin
list:x:38:38:Mailing List Manager:/var/list:/usr/sbin/nologin
irc:x:39:39:ircd:/run/ircd:/usr/sbin/nologin
_apt:x:42:65534::/nonexistent:/usr/sbin/nologin
nobody:x:65534:65534:nobody:/nonexistent:/usr/sbin/nologin
nginx:x:101:101:nginx user:/nonexistent:/bin/false
aullah
root@nginx:/#
As we can see from above, everything works, and as an attacker, I could manipulate or use various resources. Now let’s configure and use the previously distributed AppArmore profile for our Nginx Pod. Note that we need to specify the container name “nginx-secure” behind the annotation’s first part and the profile’s name “localhost/k8s-nginx” at the end.
apiVersion: v1
kind: Pod
metadata:
  annotations:
    container.apparmor.security.beta.kubernetes.io/nginx-secure: localhost/k8s-nginx
  labels:
    run: nginx-secure
  name: nginx-secure
spec:
  containers:
  - image: nginx
    name: nginx-secure
  imagePullSecrets:
  - name: regcred
  dnsPolicy: ClusterFirst
  restartPolicy: Always
(⎈ |tkg-ubuntu:default)➜ k apply -f pod-apparmor.yaml
pod/nginx-secure created
(⎈ |tkg-ubuntu:default)➜ k get pods
NAME           READY   STATUS    RESTARTS   AGE
nginx-secure   1/1     Running   0          17s
(⎈ |tkg-ubuntu:default)➜ k exec -it nginx-secure -- bash
root@nginx-secure:/# touch /root/test
touch: cannot touch '/root/test': Permission denied
root@nginx-secure:/# echo aullah >> /etc/passwd
bash: /etc/passwd: Permission denied
We can see that the AppArmor profile has been applied, and I cannot write to the root directory or write contented into “/etc/passwd”.
Conclusion
Nowadays, security is becoming more and more critical due to the ever-growing cyberattacks. IT Ops and Platform teams often struggle to keep up with patching new vulnerabilities on the node OS or container image level. AppArmor can provide another layer of security that, if embedded into the DevSecOps strategy, will help to prevent applications from being exploited.

Leave a comment