
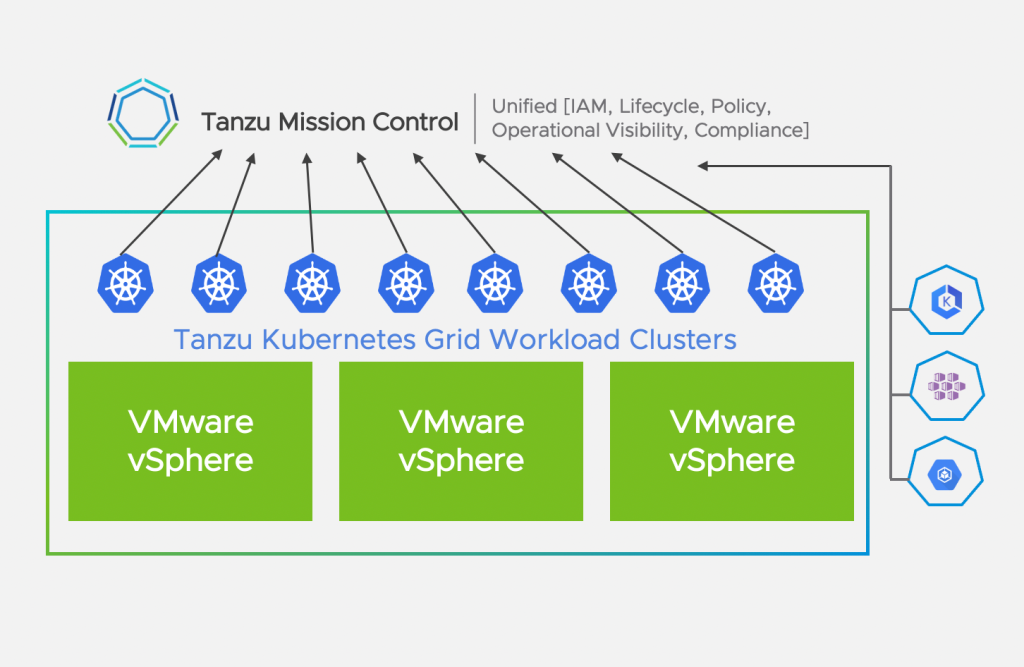
VMware Tanzu Mission Control (TMC) is a global SaaS management plane and policy engine to manage all of your Kubernetes clusters. These clusters can be VMware Tanzu Kubernetes Grid (TKG) clusters and any 3rd party Kubernetes clusters that are Kubernetes conformant. With TMC, you can define baselines of access, security, and configuration policies that can be easily applied to a whole group of clusters or namespaces. Additionally, it provides DR capabilities, compliance checking, and self-service. Among other things, the self-service allows for the creation and lifecycle of TKG clusters on AWS. Recently, TMC added “vSphere with Tanzu” as a platform to provision and lifecycle TKG clusters. This capability becomes very handy if you have to provide and manage Kubernetes in many different vSphere locations such as Robo sites, Production sites, and Datacenter sites.

Please also look at this blog post by VMware’s Morgan Fine and Ross Kukulinski and the video by Keith Lee. As always, also refer to the official documentation, which can be found here.
In this blog post, I want to explain the new TMC capability and walk you through step by step and show some automation capabilities via the TMC CLI.
vSphere with Tanzu & TMC
To use the new TMC capability, we need to add a vSphere Supervisor Cluster to TMC. Please be aware that this feature requires vSphere 7 Update1. If you want to learn how to activate the Supervisor Cluster on vSphere 7, look at the following blog posts.
- Cormac Hogan’s Getting started with vSphere with Tanzu
- William Lam’s Automated vSphere with Tanzu Lab Deployment Script
- Robert Guske’s vSphere with Tanzu – Troubleshooting HAProxy deployment
- My own Verify and Troubleshoot vSphere 7 with Kubernetes
- Official VMware documentation for vSphere with Tanzu
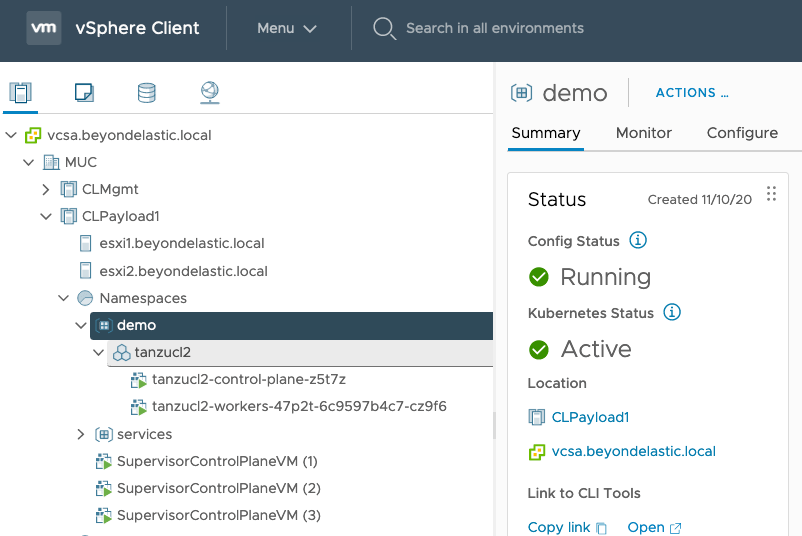
In my case, I have the vSphere Supervisor Cluster already activated and a TKG cluster “tanzucl2” provisioned in the demo namespace.
To get started, we first need to register our vSphere Supervisor Cluster with Tanzu Mission Control.
Register Management Cluster
Within the Administration menu of our TMC console, we can find a new tab called “Management clusters”. Here, we can register Management clusters, which in this case is the vSphere Supervisor Cluster.
As a side note, this feature is currently only supported for Tanzu Kubernetes Grid Service (TKGS), which refers to the integrated TKG version of vSphere with Tanzu. The other TKG option for AWS, Azure, or vSphere none integrated, referred to as Standalone or Multi-Cloud, will follow later.
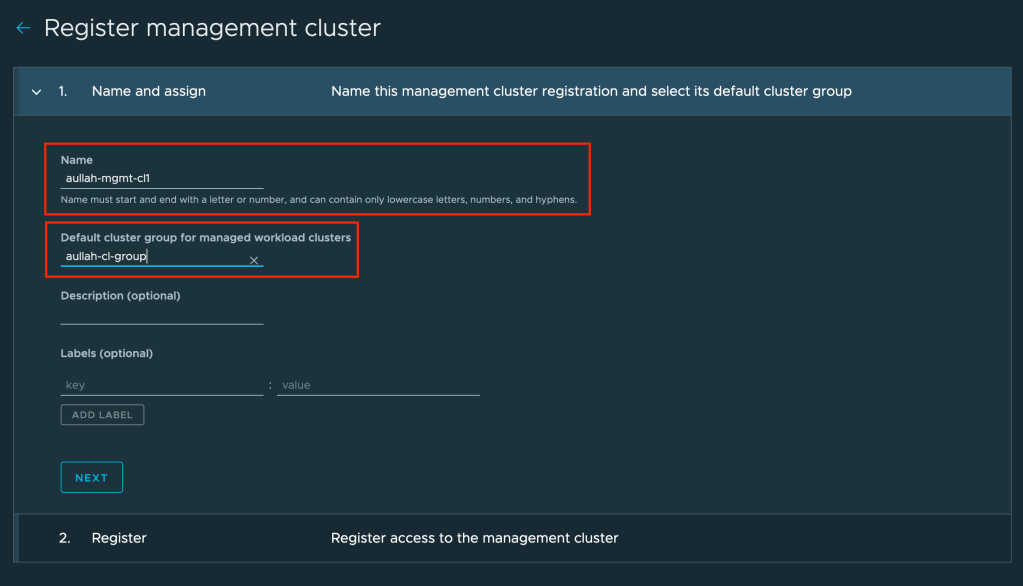
To start the registration process, we have to click on “REGISTER MANAGEMENT CLUSTER”.

Enter a name for the Management cluster and select a TMC cluster group. This cluster group will be the “default” group for the TKG clusters created via this Management Cluster. Here is a snippet from the official TMC documentation about cluster groups:
“Cluster groups allow you to organize your Kubernetes clusters into logical groupings, for example to align with business units. To get you started, Tanzu Mission Control provides a default cluster group, but you should create cluster groups to fit your business needs.”
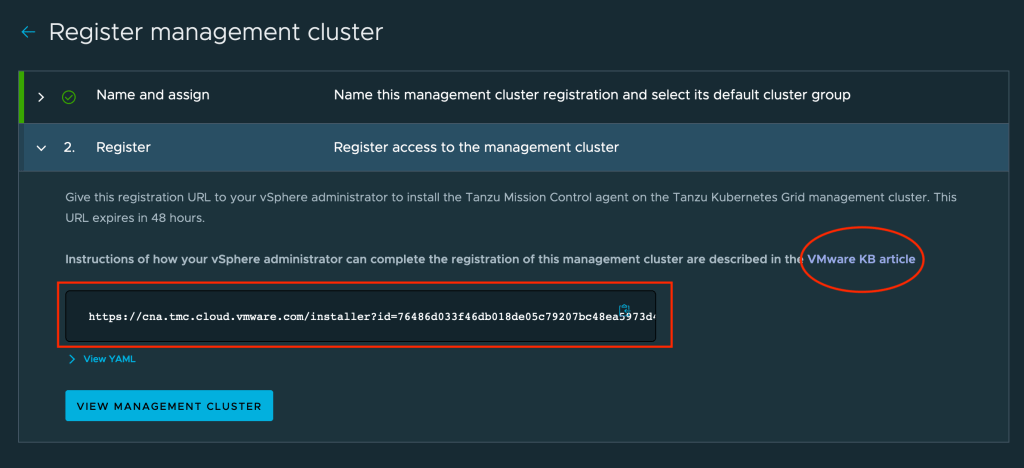
In step two, we need to copy a registration URL, which is valid for 48 hours, and follow the linked KB80727 article to complete the registration process.
As stated in the KB article, we need to identify the TMC namespace on our Supervisor Cluster. To do so, we need to login to our vSphere Supervisor cluster as “administrator@vsphere.local” and execute the following kubectl commands.
➜  ~ kubectl vsphere login --server=192.168.14.128 --insecure-skip-tls-verify

Username: administrator@vsphere.local
Password:
Logged in successfully.

You have access to the following contexts:
   192.168.14.128
   demo
   services

If the context you wish to use is not in this list, you may need to try
logging in again later, or contact your cluster administrator.

To change context, use `kubectl config use-context <workload name>`
➜  ~ kubectl config use-context 192.168.14.128
Switched to context "192.168.14.128".
➜  ~ kubectl get ns
NAME                                        STATUS   AGE
default                                     Active   36d
demo                                        Active   12d
kube-node-lease                             Active   36d
kube-public                                 Active   36d
kube-system                                 Active   36d
services                                    Active   36d
svc-tmc-c131                                Active   36d
vmware-system-appplatform-operator-system   Active   36d
vmware-system-capw                          Active   36d
vmware-system-cert-manager                  Active   36d
vmware-system-csi                           Active   36d
vmware-system-kubeimage                     Active   36d
vmware-system-lbapi                         Active   36d
vmware-system-license-operator              Active   36d
vmware-system-netop                         Active   36d
vmware-system-registry                      Active   36d
vmware-system-tkg                           Active   36d
vmware-system-ucs                           Active   36d
vmware-system-vmop                          Active   36d
As you can see from above, I have identified the TMC namespace “svc-tmc-c131” with the command “kubectl get ns“. If you don’t have such a namespace on your Supervisor cluster, you are likely not on vSphere 7 Update1 and need to update your environment (vCenter and Supervisor Cluster) first. Now we have to create a registration.yaml file with the following content. Make sure to replace the namespace and registrationLink value with the information we have gathered so far.
apiVersion: installers.tmc.cloud.vmware.com/v1alpha1
kind: AgentInstall
metadata:
  name: tmc-agent-installer-config
  namespace: svc-tmc-c131
spec:
  operation: INSTALL
  registrationLink: https://cna.tmc.cloud.vmware.com/installer?id=76486d033f46db018de04c79209bc48ea5973d41725538c4k955a581adc66e01&source=registration
We need to apply our yaml file with kubectl to register the Management cluster as a next step. Make sure that you are still using the default cluster context before executing the command. We can check the status of the registration with “kubectl describe”.
➜  ~ kubectl create -f registration.yaml
agentinstall.installers.tmc.cloud.vmware.com/tmc-agent-installer-config created
➜  ~ kubectl -n svc-tmc-c131 describe agentinstall tmc-agent-installer-config
Name:         tmc-agent-installer-config
Namespace:    svc-tmc-c131
Labels:       <none>
Annotations:  <none>
API Version:  installers.tmc.cloud.vmware.com/v1alpha1
Kind:         AgentInstall
Metadata:
  Creation Timestamp:  2020-11-22T08:31:36Z
  Generation:          2
  Managed Fields:
    API Version:  installers.tmc.cloud.vmware.com/v1alpha1
    Fields Type:  FieldsV1
    fieldsV1:
      f:status:
        .:
        f:message:
        f:status:
    Manager:      tmc-agent-installer
    Operation:    Update
    Time:         2020-11-22T08:32:12Z
    API Version:  installers.tmc.cloud.vmware.com/v1alpha1
    Fields Type:  FieldsV1
    fieldsV1:
      f:metadata:
        f:annotations:
          .:
          f:kubectl.kubernetes.io/last-applied-configuration:
      f:spec:
        .:
        f:operation:
        f:registrationLink:
    Manager:         kubectl-client-side-apply
    Operation:       Update
    Time:            2020-11-22T19:11:49Z
  Resource Version:  30444445
  Self Link:         /apis/installers.tmc.cloud.vmware.com/v1alpha1/namespaces/svc-tmc-c131/agentinstalls/tmc-agent-installer-config
  UID:               d80e7d4d-6af7-4a75-9350-dc7499a158eb
Spec:
  Operation:          INSTALL
  Registration Link:  https://cna.tmc.cloud.vmware.com/installer?id=76486d033f46db018de05c79207bc48ea5973d42725538c4b955a581adc66e01&source=registration
Status:
  Message:  successfully applied the registration link
  Status:   INSTALLED
Events:     <none>
We should now see that the Management cluster appears in TMC. It will take some time until the synchronization completes and the status changes to “Ready”.
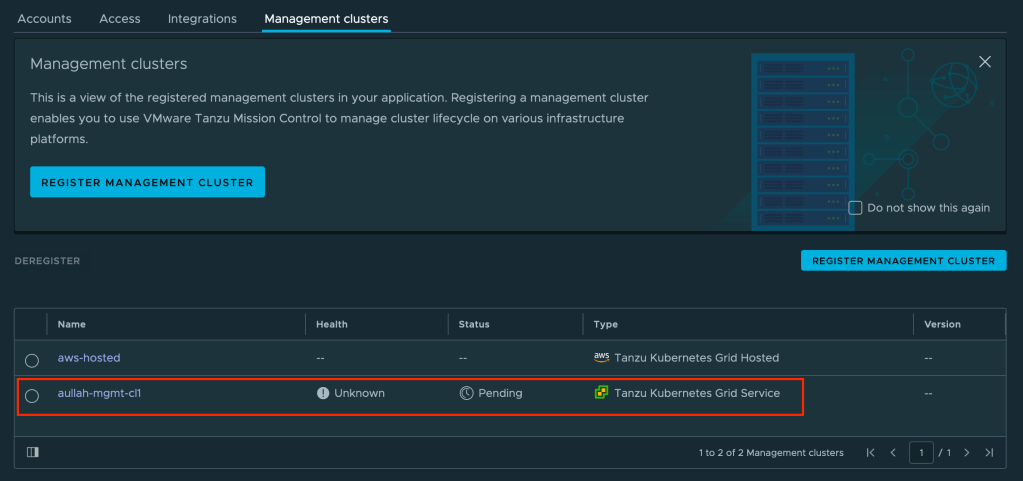
After a while, we should now see additional details about our Management cluster, such as the health state, Provisioners, and Workload clusters. The Provisioners are the Namespaces created on our Supervisor cluster. We will need to reference a Provisioner when we deploy a TKG cluster later. See this snippet from the official documentation:
For a Tanzu Kubernetes cluster running in vSphere with Tanzu, you add a provisioner by creating a vSphere namespace in the Supervisor Cluster, which you can do in your vSphere environment. For more information, see Working with vSphere Namespaces on a Supervisor Cluster in the vSphere with Tanzu Configuration and Management documentation.

E voila, we have successfully registered the vSphere Supervisor Cluster as a Management cluster in TMC. Let’s have a look at how we can automate that process via the TMC CLI.
Automate Management Cluster registration via TMC CLI
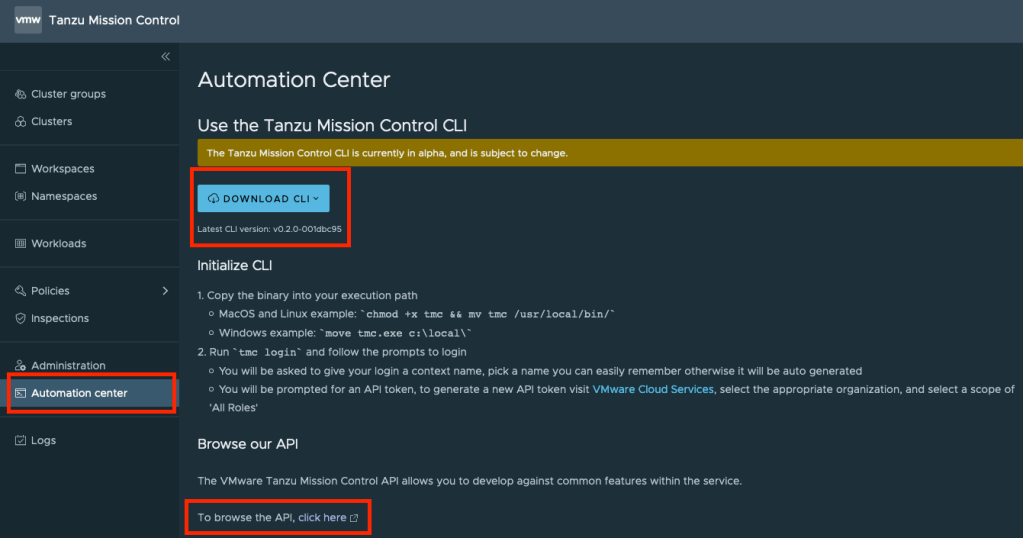
To automate specific tasks within TMC, we can use the TMC CLI. The CLI binaries can be downloaded via the “Automation center” menu within TMC. We can also browse the API reference here.
While working with the TMC CLI, I found out that it has a handy “completion” function to create an auto-completion script for bash or Zsh shell. As I am using Zsh with the oh-my-zsh framework, I had to do the following to add the completion script.
➜  ~ tmc completion zsh > _tmc
➜  ~ mv _tmc .oh-my-zsh/completions
➜  ~ echo "autoload -Uz compinit && compinit" >> $HOME/.zshrc
Please be aware that this might differ from your client and shell configuration. Have a look at the TMC CLI documentation under point 5, “Completion”.
Before we start using the TMC CLI, we need to create an API token and login to the TMC endpoint via “tmc login“. Please refer to the documentation on how to generate the token.
➜  ~ tmc login
i If you don't have an API token, visit the VMware Cloud Services console, select your organization, and create an API token with the TMC service roles:
  https://console.cloud.vmware.com/csp/gateway/portal/#/user/tokens
? API Token ****************************************************************
? Login context name aullah-context
? Select default log level info
? Management Cluster Name aullah-mgmt-cl1
? Provisioner Name demo
√ Successfully created context aullah-context, to manage your contexts run `tmc system context -h`
Now we can start with the registration of our Management cluster via the TMC CLI. We can either execute a single command or go for a more GitOps like approach and specify everything in a yaml file. Let’s start with the command line option first. The “tmc managementcluster register” command simplifies the process a lot as it will also create the necessary AgentInstall resource on your Supervisor cluster. So you don’t have to execute the registration.yaml as a separate step. The only thing we need to do to make this happen is to specify the correct kubectl config file with access to our Supervisor Cluster.
➜  ~ tmc managementcluster register aullah-mgmt-cl1 -c aullah-cl-group -p TKGS -k "$HOME/.kube/config"
√ management cluster "aullah-mgmt-cl1" created successfully
i identifying TMC namespace
i installing TMC agents on the management cluster
┤ √ TMC agents installed on management cluster
√ management cluster successfully registered to TMC
The second option is to create a Management cluster yaml file with the following content.
fullName:
  name: aullah-mgmt-cl1
meta:
  description: ""
  labels: null
spec:
  defaultClusterGroup: aullah-cl-group
  kubernetesProviderType: VMWARE_TANZU_KUBERNETES_GRID_SERVICE
type:
  kind: ManagementCluster
  package: vmware.tanzu.manage.v1alpha1.managementcluster
  version: v1alpha1
Then apply the yaml file and get the registration URL with the following two commands.
➜  ~ tmc managementcluster create -f managementcluster-tmc.yaml
√ managementcluster "aullah-mgmt-cl1" is being created
➜  ~ tmc managementcluster get aullah-mgmt-cl1
fullName:
  name: aullah-mgmt-cl1
apiVersion: installers.tmc.cloud.vmware.com/v1alpha1
  orgId: b00b7417-0101-48e7-a763-xx3c8d06j323
meta:
  creationTime: "2020-12-03T21:10:58.826992Z"
  resourceVersion: "1"
  uid: mc:02ERN788FD0KHDPOKHDYJFB158
  updateTime: "2020-12-03T21:10:58.826992Z"
spec:
  defaultClusterGroup: aullah-cl-group
  kubernetesProviderType: VMWARE_TANZU_KUBERNETES_GRID_SERVICE
status:
  allocatedCpu: {}
  allocatedMemory: {}
  conditions:
    READY:
      message: management cluster is not yet attached to TMC
      reason: 'phase: PENDING, health: HEALTH_UNSPECIFIED'
      severity: INFO
      type: READY
  healthDetails:
    controllerManagerHealth: {}
    schedulerHealth: {}
    timestamp: "0001-01-01T00:00:00Z"
  kubernetesProvider: {}
  lastUpdate: "2020-12-03T21:10:58.826992Z"
  phase: PENDING
  registrationUrl: https://saleseng.tmc.cloud.vmware.com/installer?id=a7a3c3c810083e2026ed23b333c7460f40d9b1831zz5f2157fe5dd8804983a37&source=registration
After we got the registration URL, we need to create and execute the registration.yaml file and run it against our Supervisor Cluster, as mentioned above or in KB80727. As soon as the registration completes and the status information got synced to TMC, we can start working with our Management cluster.
Provision TKG clusters on vSphere
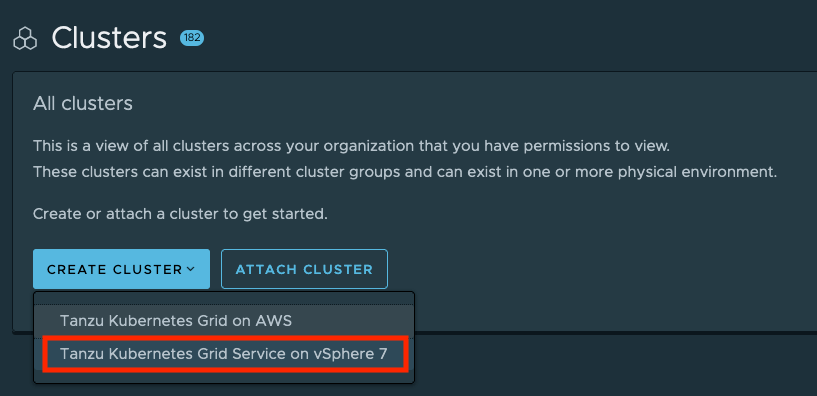
Now that we have the Supervisor cluster registered as a Management cluster in TMC, we can deploy and lifecycle new TKG clusters on vSphere. Click on “CREATE CLUSTER” and select “Tanzu Kubernetes Grid Service on vSphere 7” to start.
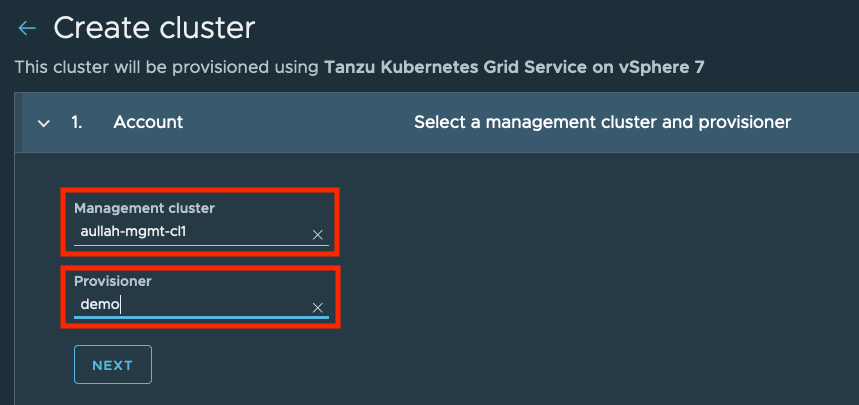
During the first step, we need to select the Management cluster, which we have registered earlier. Additionally, we need to choose the Provisioner (Namespace) in which we want to deploy our TKG cluster.
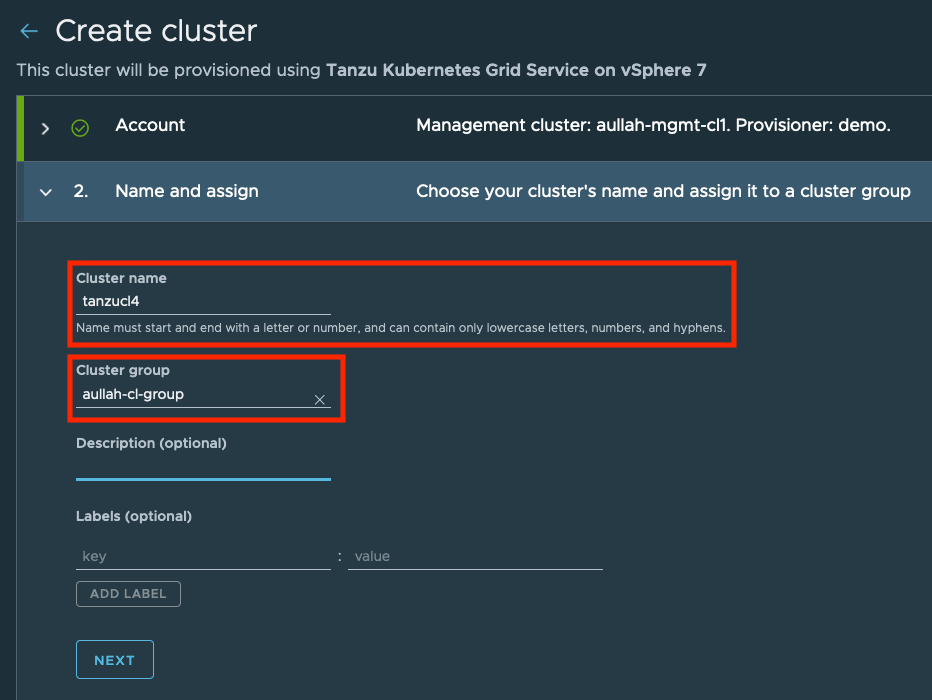
We will then specify a name for the TKG cluster we want to create and select a TMC cluster group in which the cluster should be placed.
As a next step, we need to select the Kubernetes version we want to deploy and configure Kubernetes cluster networking (Pod and Service CIDRs) and storage.

We can specify multiple storage classes in the storage configuration that will be added to the TKG cluster and select one default storage class. Make sure to choose only storage classes configured for your Provisioner (Namespace on the Supervisor Cluster). Otherwise, you will get an error at the end of the process, stating that the storage class is not assigned to the namespace.

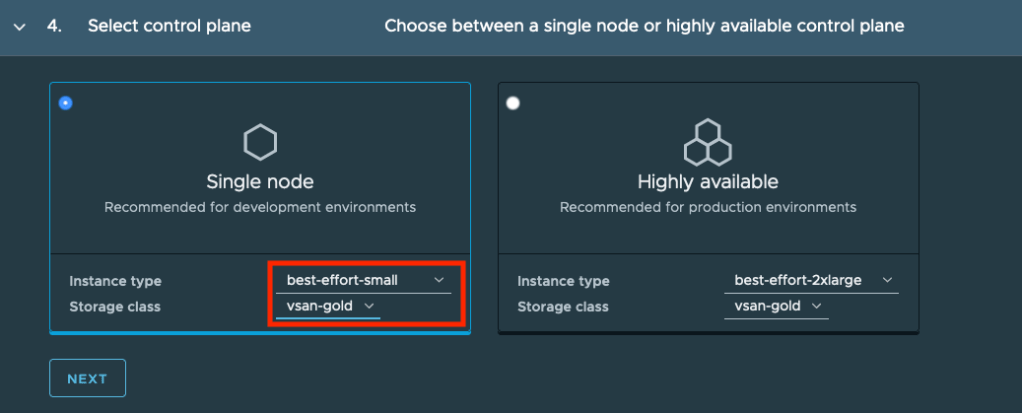
In step 4, we will select if we want a single node control plane or a highly available control plane with three nodes. Additionally, we can choose the Instance type and storage class. You select which Virtual Machine Class (CPU, Memory, non-reserved, reserved) will be used with the Instance type. You can find the definitions of Virtual Machine classes here.
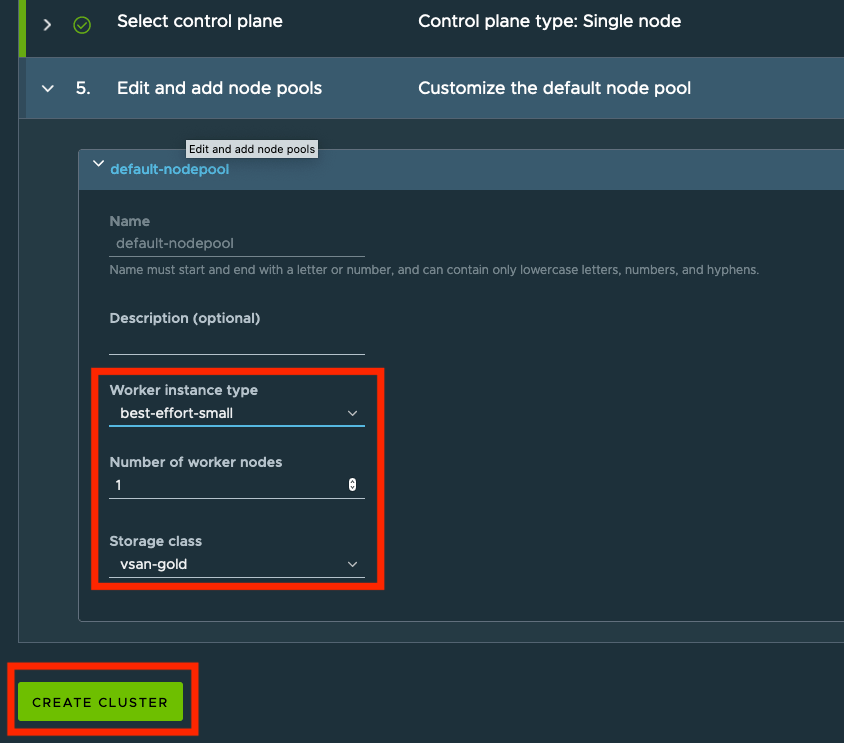
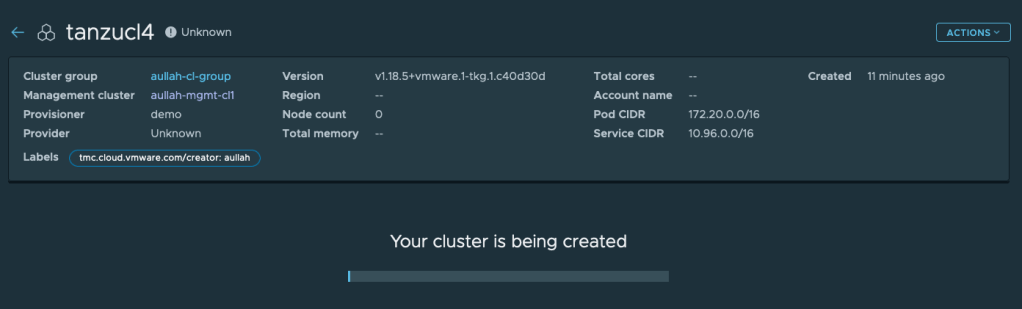
The last step is to specify the Instance type, quantity, and storage class for the worker nodes of the TKG cluster. After clicking on “Create Cluster” the creation process will be started.
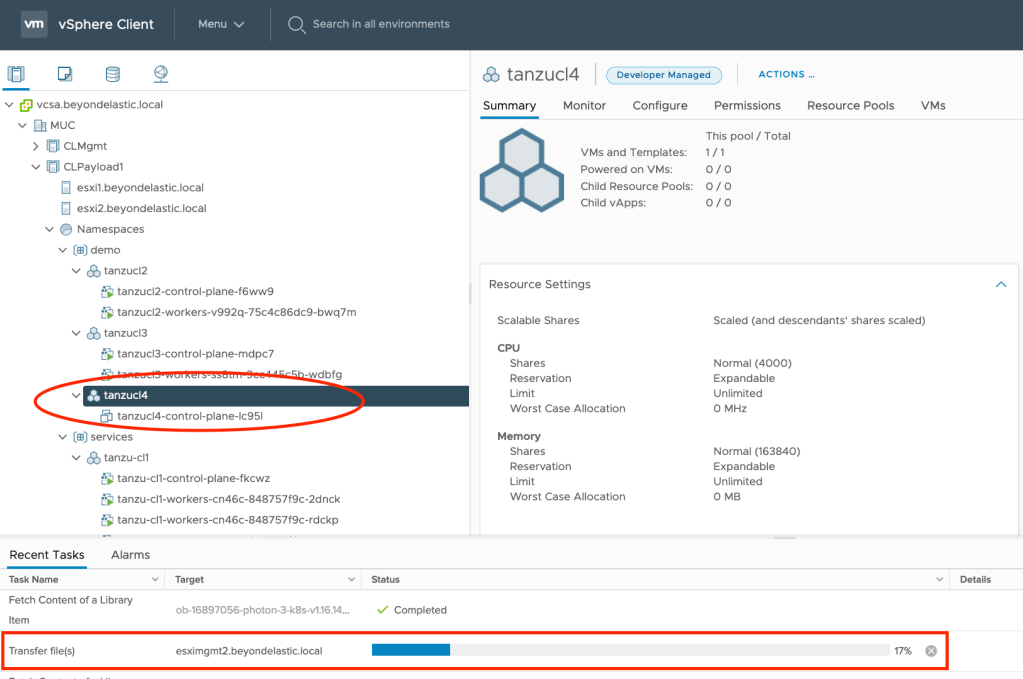
This process will take some time as TKG node VMs are being cloned from your vSphere Content Library’s available images.
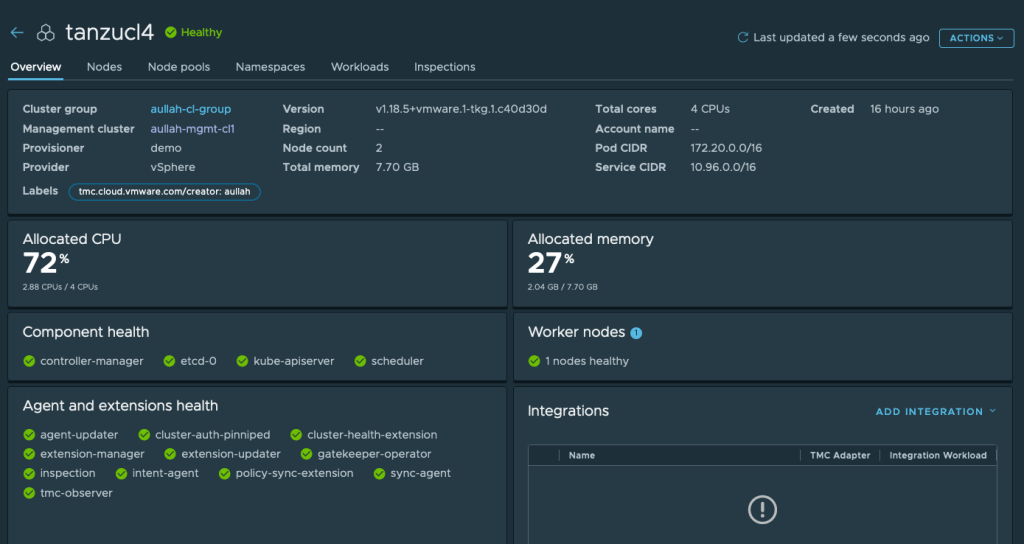
After a while, the cluster will be ready, and we can make use of all the excellent TMC functionalities such as:
- Accessing the cluster (get the kubeconfig file from TMC)
- Scaling the cluster (add additional nodes)
- Upgrading the cluster to a new Kubernetes version
- Assigning policies and so on and so forth
Automate the TKG cluster creation via TMC CLI
The TKG clusters can be created either via single command or in a declarative way via a yaml file. The single command option would look like the following.
➜  ~ tmc cluster create -t tkgs --name tanzucl5 -m aullah-mgmt-cl1 -p demo --cluster-group aullah-cl-group --version "v1.18.5+vmware.1-tkg.1.c40d30d" --storage-class vsan-gold --allowed-storage-classes vsan-gold --default-storage-class vsan-gold --instance-type best-effort-small --worker-instance-type best-effort-small
i using template "tkgs"
√ cluster "tanzucl5" is being created
If you are going for the single command option, I recommend using the –dry-run option to test things first. If you got it right, the command’s output with the –dry-run flag can be used as content for a configuration yaml file.
The content of such a yaml file should look similar to this.
fullName:
  managementClusterName: aullah-mgmt-cl1
  name: tanzucl5
  provisionerName: demo
meta:
  labels: null
spec:
  clusterGroupName: default
  tkgServiceVsphere:
    distribution:
      version: v1.18.5+vmware.1-tkg.1.c40d30d
    settings:
      network:
        pods:
          cidrBlocks:
          - 192.0.2.0/16
        services:
          cidrBlocks:
          - 198.51.100.0/12
      storage:
        classes:
        - vsan-gold
        defaultClass: vsan-gold
    topology:
      controlPlane:
        class: best-effort-small
        highAvailability: false
        storageClass: vsan-gold
      nodePools:
      - info:
          description: default description for the nodepool
          name: default-node-pool
        spec:
          tkgServiceVsphere:
            class: best-effort-small
            storageClass: vsan-gold
          workerNodeCount: "1"
type:
  kind: Cluster
  package: vmware.tanzu.manage.v1alpha1.cluster
  version: v1alpha1
We need to apply the yaml file with the following command, and the TKG cluster will be created based on our specifications.
➜  ~ tmc cluster create -f tkgs-tmc-cluster.yaml
√ cluster "tanzucl6" is being created
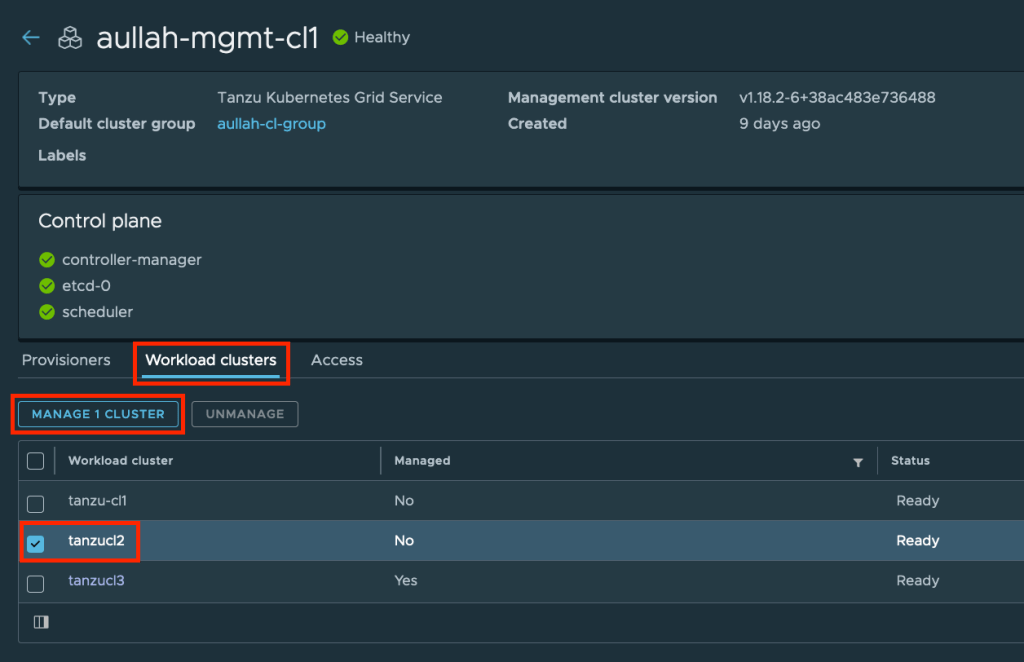
Attach an existing TKG cluster to TMC
We can put existing TKG clusters under the management of TMC. In my case, I already have some TKG clusters on vSphere, which were provisioned via the Supervisor Cluster. I have to go to the “Workload clusters” tab, select the TKG cluster that I want to add, and click on “Manage 1 Cluster”.
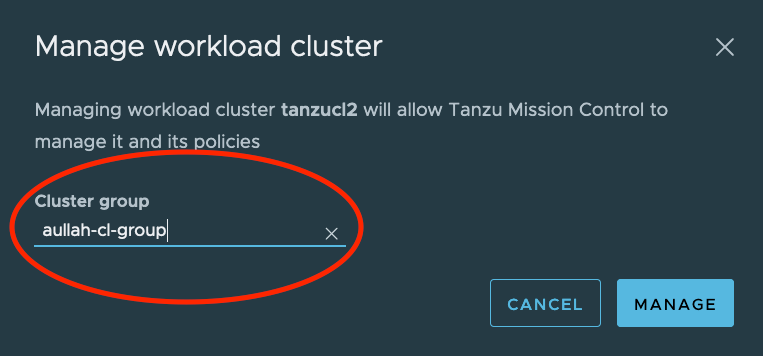
We then need to select a TMC Cluster Group in which the TKG cluster will be placed.
The TMC agents will be installed in the background, and soon we will see the TKG cluster showing up under the Clusters view of TMC.

Access TMC managed TKG clusters
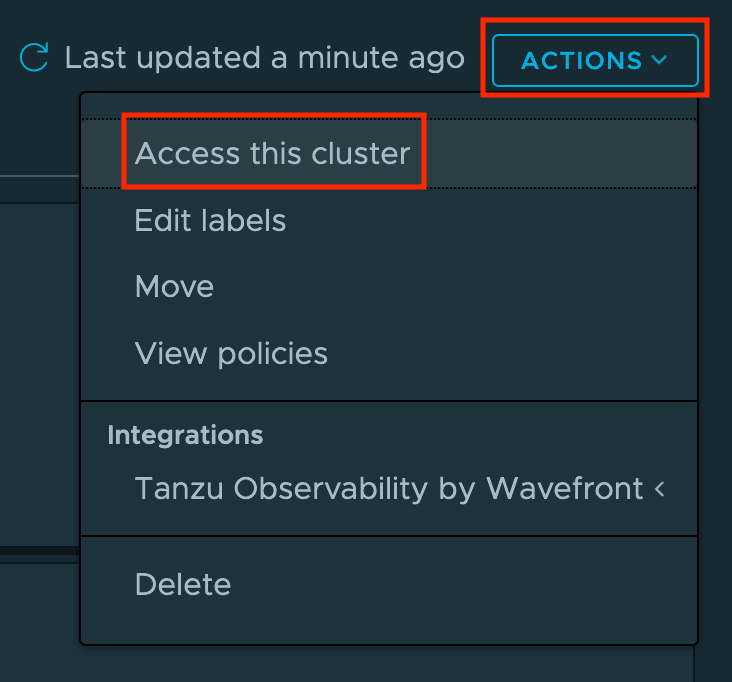
To access our TMC managed TKG clusters, we can either use the TMC console or the TMC CLI to download the kubeconfig file. Within the TMC console, we can click on “ACTIONS” and “Access this cluster”.
After downloading the kubeconfig file, we need to execute a kubectl command using the config to authenticate against TMC (first time). This process requires the user to login with their TMC API token via the TMC CLI, which generates and sends a cert/key pair down to the cluster. This cert/key is subsequently used to authenticate against the Kubernetes cluster.

The other option is to use TMC CLI. To download the kubeconfig, we can use the “tmc cluster auth kubeconfig get” command as shown here. Additionally, I will merge the new kubeconfig file with my existing one, switch the kubectl context to the new cluster, and execute a kubectl command to initialize the config.
➜  ~ tmc cluster auth kubeconfig get tanzucl5 -m aullah-mgmt-cl1 -p demo > /$HOME/.kube/kubeconfig-tanzucl5.yml
➜  ~ export KUBECONFIG=cluster-merge:/Users/aullah/.kube/config:/Users/aullah/.kube/kubeconfig-tanzucl5.yml
➜  ~ kubectl config use-context tanzucl5
Switched to context "tanzucl5".
➜  ~ kubectl get nodes
NAME                                      STATUS   ROLES    AGE   VERSION
tanzucl5-control-plane-n8bjp              Ready    master   14h   v1.18.5+vmware.1
tanzucl5-workers-x2srx-7fcf98fff9-d8t4t   Ready    <none>   13h   v1.18.5+vmware.1
Conclusion
To summarize, I think this feature makes a huge difference for anyone who needs to provide and manage Kubernetes clusters in many different vSphere locations. I am talking to customers daily, and a lot of them are looking for ways to offer Kubernetes to Edge & Robo locations. These locations can be retail stores, production plants, or just different office sites, and in most cases, vSphere is being used already. With this new functionality, TMC customers can visualize, control, and secure Kubernetes clusters and lifecycle (provision, scale, upgrade, delete) TKG clusters at these locations.
The option to automate specific tasks via the TMC CLI makes a lot of sense, especially if we are talking about plenty of different locations and potentially plenty of Kubernetes clusters. Additionally, using a declarative model (Infrastructure as Code) is very beneficial as customers move more and more towards a GitOps model. There is an excellent VMworld session KUB2306 by VMware’s Keith Lee and Sam McGeown about GitOps with TMC.
Since the launch of Tanzu Editions, TMC is an essential part of the Tanzu Standard Edition. This means every Tanzu Standard customer is entitled to use TMC for Kubernetes cluster management on vSphere with Tanzu. You can find a comparison chart about which features are available with Tanzu Standard compared to full TMC here. If you want to learn more about the TMC features that we have not covered in this blog post, check out the links provided in the Sources section.
Sources
- VMware Tanzu Mission Control
- VMware Tanzu Mission Control demo
- Blog post by Morgan Fine, Ross Kukulinski and Keith Lee TKG lifecycle with TMC
- Official VMware documentation – Managing the Lifecycle of Tanzu Kubernetes Clusters via Tanzu Mission Control
- Official VMware documentation for Tanzu Mission Control
- VMware Tanzu Kubernetes Grid
- Official VMware Tanzu Kubernetes Grid release notes
- Blog post by Cormac Hogan Getting started with vSphere with Tanzu
- Blog post by William Lam Automated vSphere with Tanzu Lab Deployment Script
- Blog post Robert Guske vSphere with Tanzu – Troubleshooting HAProxy deployment
- My own Verify and Troubleshoot vSphere 7 with Kubernetes
- Official VMware documentation for vSphere with Tanzu
- Official VMware vSphere with Tanzu release notes
- Management Cluster registration KB80727 article
- Overview kubectl
- Working with vSphere Namespaces on a Supervisor Cluster
- Tanzu Mission Control API reference
- Oh-My-Zsh framework
- TMC CLI documentation
- Official VMware documentation – Log In with the Tanzu Mission Control CLI
- Official VMware documentation – Virtual Machine Class Types for Tanzu Kubernetes Clusters
- VMworld Session KUB2306 by Keith Lee and Sam McGeown about GitOps with TMC
- Simplify Your Approach to Application Modernization with 4 Simple Editions for the Tanzu Portfolio
- Comparison chart TMC in Tanzu Standard and TMC full

Leave a comment