
Part of my responsibility as a Kubernetes Lead Solutions Engineer at VMware is to help customers evaluating our products within their environments. vSphere 7 with Kubernetes (aka Project Pacific) got released beginning of April and is VMware’s integration of Kubernetes into vSphere. The interest and the demand for test implementations have never been higher than at this very moment.
There are plenty of useful posts, scripts, or documentations available to implement vSphere 7 with Kubernetes on your own. If you are looking for a script to automate the installation of a nested environment, have a look at this blog post from William Lam. Nevertheless, what if you run into an issue or if the pre-requisites are not implemented correctly?
In this blog post, I want to go through the essential pre-requisites, demonstrate ways to verify your environment, and show common mistakes as well as useful troubleshooting tips.
Pre-Requisites
Let’s start with the pre-requisites. What do we need to implement vSphere 7 with Kubernetes? The minimal supported configuration requires at least 3x ESXi 7 hosts. However, if you don’t have three hosts available, you can deploy everything nested, running the necessary ESXi hypervisor hosts as VMs. Additionally, you can further reduce the resource footprint, as pointed out by William Lam in this blog post.
Please note, running vSphere 7 with Kubernetes nested or with less than the officially documented resources is not supported by VMware.
For those of you want to run vSphere 7 with Kubernetes nested, ensure promiscuous mode and forged transmit are enabled as described here. Nevertheless, I will not explicitly cover a nested approach in this blog post. Still, a lot of the following content can be used to verify and troubleshoot vSphere 7 with Kubernetes nested or not nested.
What are the necessary pre-requisites, without going too much into the “how much resources do I need” discussion and excluding the general vSphere requirements that should be available anyhow.
- vCenter Server version 7.0 (download)
- ESXi host(s) version 7.0 (download) with at least two network interfaces
- VMware vSphere 7 Enterprise Plus with Add-on for Kubernetes license key
- HA and DRS enabled vSphere Cluster (fully automated)
- Shared storage connected to all ESXi Hosts
- roughly 1TB thin provisioned
- NTP configured and working on all components
- DNS server configured, reachable, and working
- NSX-T 3.0 (download) with a working overlay network
- at least 1x NSX Manager
- at least 1x Edge node
- at least 1x VLAN and subnet for the overlay network
- MTU size of at least 1600
- … see the documentation for official NSX-T requirements
- 2x subnets for ingress and egress traffic
- 5x free IPs in a row on the management network for the Supervisor Control Plane
For a more detailed list of pre-requisites, please have a look at the official VMware documentation page here.
If everything above is in place, we can start verifying the environment with a few simple tests. The two most common issues I saw so far were either a misconfigured Network or time drifts between the components due to a wrong NTP configuration. Let’s start with verifying the Network and NSX-T configuration.
Network / NSX-T
As you can see from the pre-requisites, we need to have an NSX-T installation with a working overlay network between the ESXi host(s) and the NSX-T Edge node(s). I am not going to cover the installation and configuration of NSX-T within this blog post. The official documentation for implementing NSX-T with vSphere 7 with Kubernetes can be found here.
Verify Overlay Network
However, we should test the NSX-T overlay network to see if everything is working as expected. To do so, we can use the vmkping command from one of the ESXi hosts. Connect to one of the hosts’ shell and execute the following command while specifying the Tunnel Endpoints (TEP) IP address from one of the other hosts or edge nodes.
vmkping ++netstack=vxlan -s 1572 -d x.x.x.x
The -s parameter specifies the size of the ICMP data to sent in bytes (excluding the IP header), and the -d argument disables the packet fragmentation. For a complete list of parameters, have a look at this vmkping kb article.
We can find the TEP IPs from the ESXi hosts and Edge nodes in the NSX-T Manager UI under System/Fabric/Nodes.

[root@esxi7srv4:~] vmkping ++netstack=vxlan -s 1572 -d 192.168.1.13
PING 192.168.1.13 (192.168.1.13): 1572 data bytes
1580 bytes from 192.168.1.13: icmp_seq=0 ttl=64 time=0.834 ms
1580 bytes from 192.168.1.13: icmp_seq=1 ttl=64 time=0.762 ms
1580 bytes from 192.168.1.13: icmp_seq=2 ttl=64 time=0.824 ms

--- 192.168.1.13 ping statistics ---
3 packets transmitted, 3 packets received, 0% packet loss
round-trip min/avg/max = 0.762/0.807/0.834 ms
Make sure that you can reach all ESXi Hosts and Edge nodes with their TEP IPs. If that is the case, you have a working overlay network, and you can continue.
Verify Architecture
If the vmkping is not successful for some reason, we should double-check if the Network pre-requisites are in place and if NSX-T is configured correctly. The first question I always ask, when troubleshooting NSX-T with vSphere 7 is, do you have 1x VLAN or 2x VLANs for the overlay traffic?
With vSphere 7.0, we can use the Distributed Switch version 7.0 for NSX-T and create NSX Distributed Portgroups on top of it. That being said, you need to make some critical design decisions here. If you plan to use the Distributed Switch version 7.0, you need to make sure the overlay traffic for your ESXi hosts and the NSX-T Edge nodes is separated.
Option 1 with 1x VLAN for overlay traffic: This option allows for only one VLAN for the overlay network. However, traffic must always traverse an ESXi pNIC, so you need to use two different vSphere Distributed Switches for Edge and Host traffic. If you only have two network interfaces per ESXi host, you won’t have redundancy as there is no standby adapter left. This option might be acceptable for a POC, but not for a production environment.
Option 2 with 2x VLANs for overlay traffic: Use two different VLANs, one for ESXi host overlay traffic and one for NSX-T Edge overlay traffic. This option would allow you to use only one vSphere Distributed Switch, but you need to configure routing between both VLANs (Networks) on your corporate network.
I wanted to point out that this is an important design decision when using the vSphere Distributed Switch 7.0 with NSX-T. I have seen this done wrong plenty of times, leading to a nonfunctional overlay network.
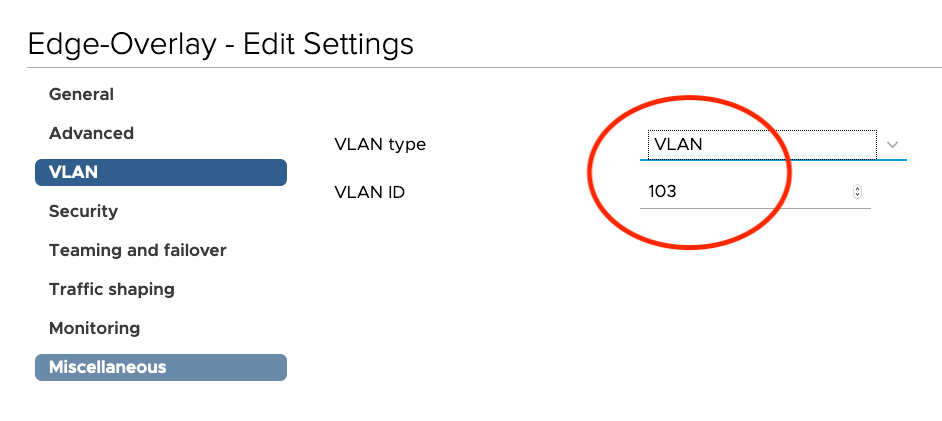
Verify VLANs and MTU sizes
The other most common issues are missing VLANs or wrong MTU sizes. The MTU size needs to be 1600 or above for the GENEVE encapsulation. Ensure that you check the settings with your Network Administrator on the switch ports your ESXi hosts are connected. Additionally, verify the configuration of the vSphere Distributed Switches and NSX-T Uplink Profiles, as shown here:

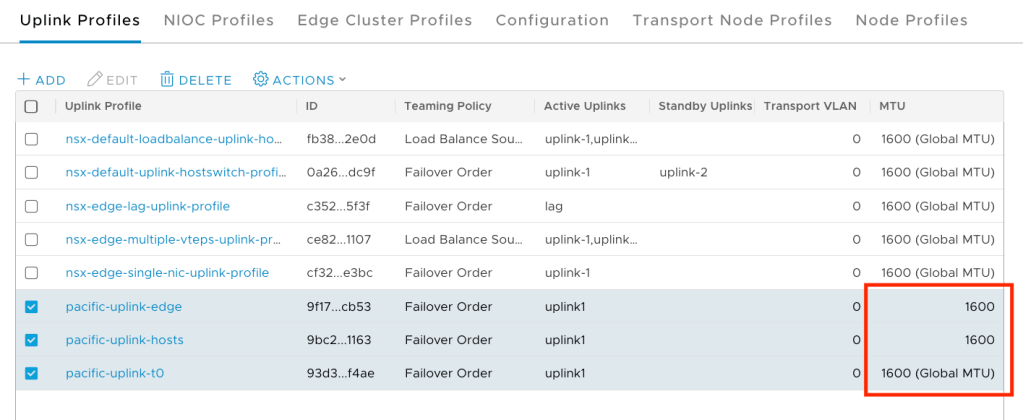
Make sure the correct VLANs are configured on the vSphere Port Groups, and on the physical network ports, your ESXi hosts are connected.
Verify Routing
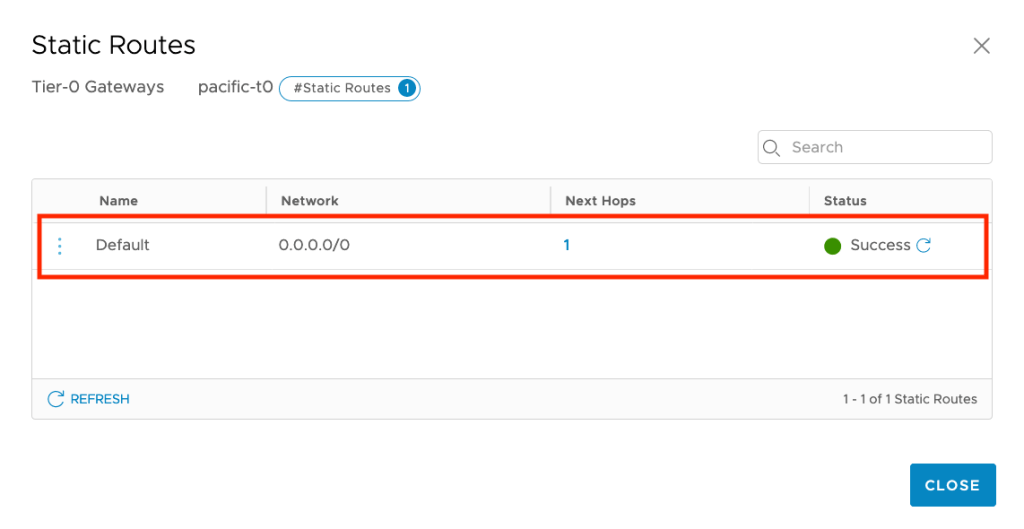
We need to have either static routes or BGP peering to ensure we can reach the virtual networks of NSX-T via the uplink port of our T0 router. To test the communication between the external and the NSX-T world, try to ping the Uplink Interface’s IP from your corporate network.
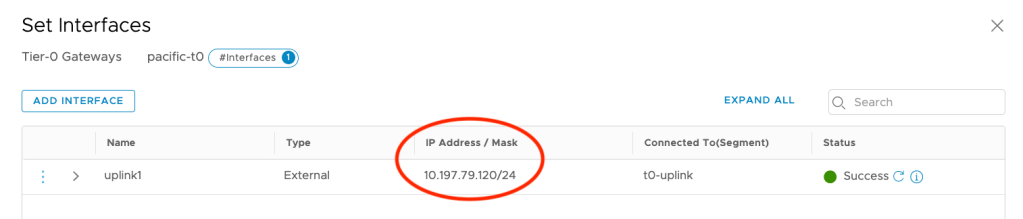
If this is not working, double-check that BGP peering or static routes on both sides (Corporate Network and NSX-T). Use tracepath or traceroute commands to verify where the packets being routed.
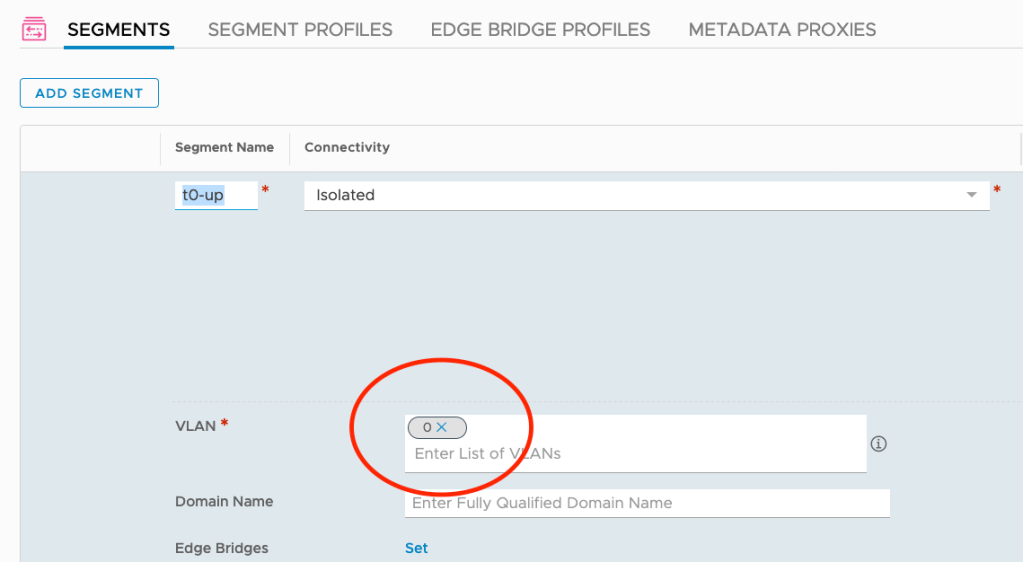
Another common issue is double tagging on the VLAN used for the NSX-T Uplink Segment. In most of the cases, the VLAN tagging is done on the vSphere Port Group.
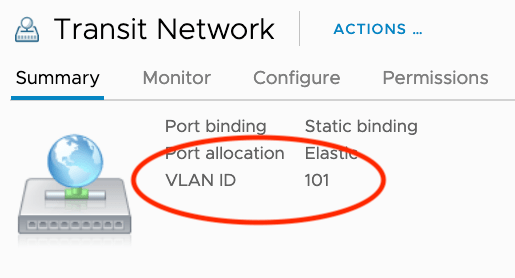
If that is the case, you need to set the VLAN for the Uplink Segment to “0” to avoid communication problems.
The communication to the Uplink interface should work now. Nevertheless, don’t forget to check if there is also a route on your corporate network to your ingress and egress subnets. The next hop for these networks needs to be the T0 Uplink Interface IP that we tried to ping in the previous test.
NTP / Timezone
Time drifts between the components can cause a lot of different issues. It can lead to a situation where your vSphere Cluster is listed as incompatible for the Supervisor Cluster enablement, or the NSX NCP pod fails.
Verify vSphere Time
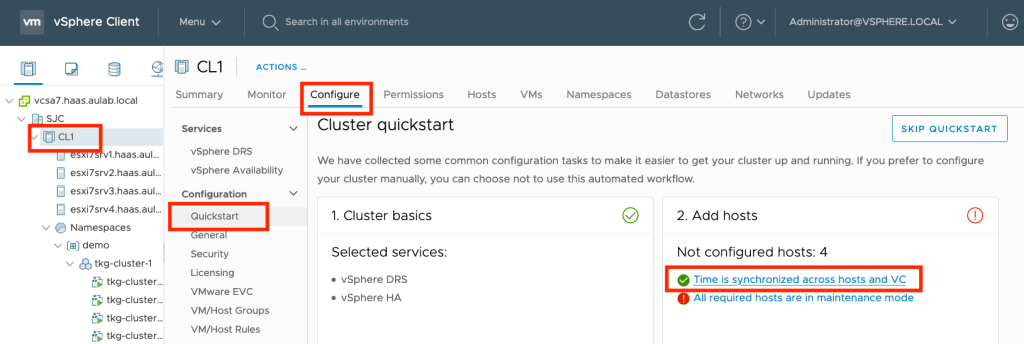
We can quickly check the NTP configuration of a vSphere Cluster via the vSphere Client. Simply click on the vSphere Cluster you want to check, click on the “Configure” tab and select “Quickstart” under the Configuration menu. If the checkbox in front of “Time is synchronized across hosts and VC” is green, everything is ok from the vSphere perspective.
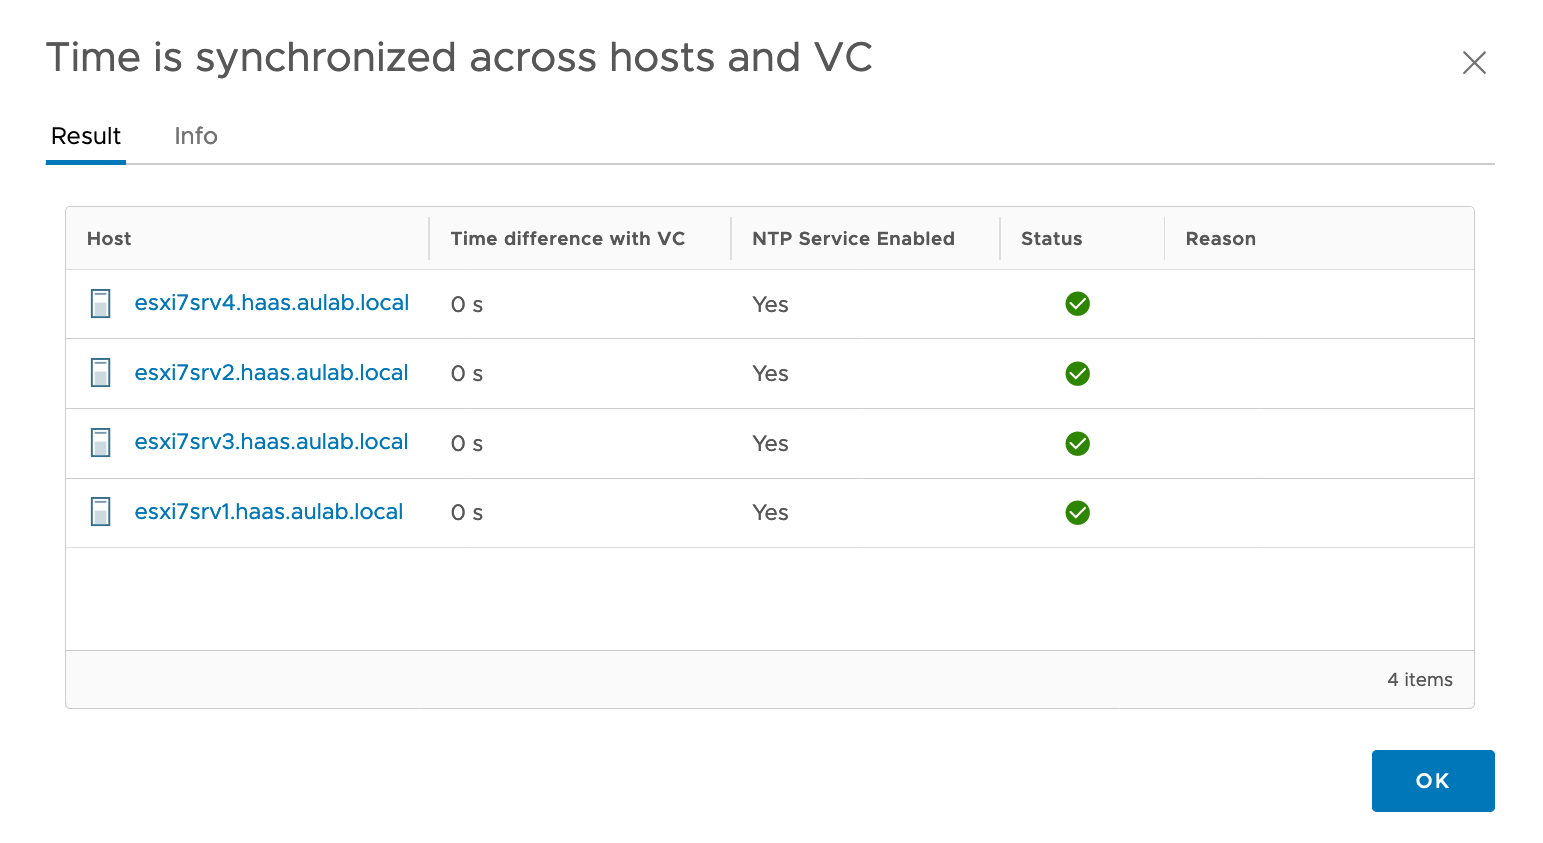
If you want to get more details, click on the link. As you can see here, there are no time drifts between vCenter and the ESXi hosts.
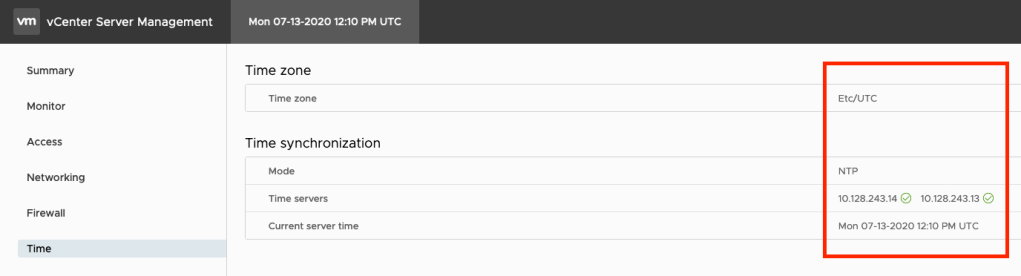
If you have time differences or NTP is not enabled, you can change the ESXi hosts’ settings via the vSphere Client and for the vCenter Server within the VCSA Admin page.

Verify NSX-T Time
We still need to check the NTP configuration of the NSX-T components compared to the vCenter Server. Just ssh to the NSX-T Manager with the admin user and execute the following NSXCLI commands.
nsx3pacific> get ntp-servers
10.128.243.13
10.128.243.14

nsx3pacific> get ntp-server associations
     remote           refid      st t when poll reach   delay   offset  jitter
==============================================================================
+10.128.243.13   .GNSS.           1 u  680 1024  377    0.705    0.071   0.256
*10.128.243.14   .GNSS.           1 u 1005 1024  377    0.761   -0.004   7.036

nsx3pacific> get clock
Mon Jul 13 2020 UTC 12:23:03.576
Repeat the same steps for your NSX-T Edge node and compare the settings and time with the vCenter Server’s values. If there is no drift between vCenter, NSX-T Manager, and NSX-T Edge nodes, you are good to go.
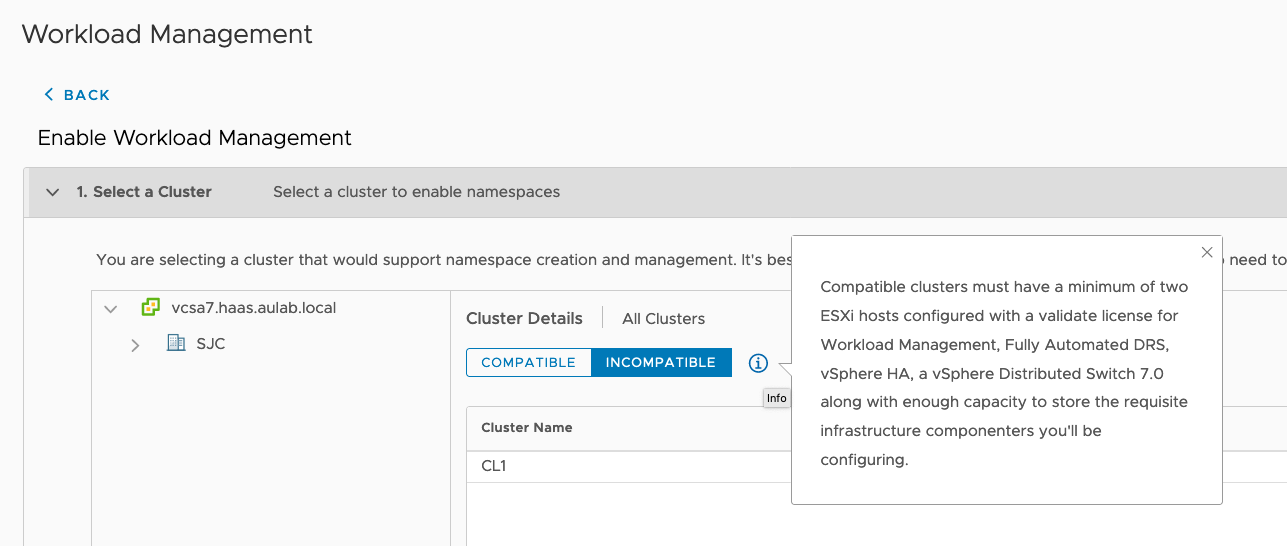
Incompatible Cluster
One of the most common challenges is that the vSphere cluster is shown as incompatible. Hence you can not enable the Supervisor functionality. The reason for clusters to be incompatible can be diverse. It can be that the HA or DRS is not activated; it can be NTP or something else. Unfortunately, the reason is not shown in the vSphere Client.
If you want to get more details about the incompatibility, you can use the dcli command on the vCenter Server Appliance. Just connect to the VCSA via ssh and execute the following command:
dcli com vmware vcenter namespacemanagement clustercompatibility list
root@vcsa7 [ ~ ]# dcli com vmware vcenter namespacemanagement clustercompatibility list
|---------|----------|----------------------------------------------------------------------------------------|
|cluster |compatible|incompatibility_reasons |
|---------|----------|----------------------------------------------------------------------------------------|
|domain-c8|False     |Failed to list all distributed switches in vCenter 78c7b057-bf11-409c-9da6-4eab08940d6f.|
|         |          |Cluster domain-c8 is missing compatible NSX-T VDS. |
|---------|----------|----------------------------------------------------------------------------------------|
In this scenario, I forgot the enable Trust on the NSX-T Compute Manager object for authentication with vCenter Server 7.0. That’s why it cannot list the distributed switches in vCenter. If this is not enabled, you won’t be able to create a Supervisor Cluster. The vSphere Cluster will be shown as incompatible until you fix it. As shown here, we need to go to the NSX-T Manager and enable Trust for the Compute Manager object.
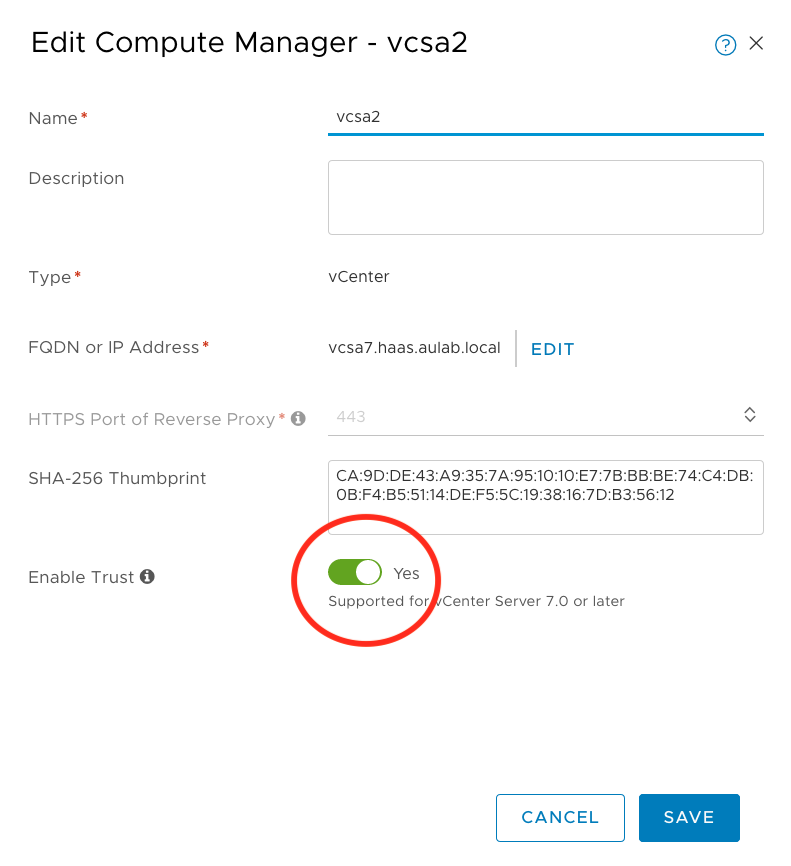
Please be aware that you will see the same issue if the authentication is not working due to time drifts. Again, make sure NTP is working.
After we have enabled the Trust between NSX-T and vCenter, we should see that the cluster is compatible.
root@vcsa7 [ ~ ]# dcli com vmware vcenter namespacemanagement clustercompatibility list
|---------|----------|-----------------------|
|cluster  |compatible|incompatibility_reasons|
|---------|----------|-----------------------|
|domain-c8|True      |                       |
|---------|----------|-----------------------|
This misconfiguration is only one reason why your cluster might be incompatible. Here is a list of things that you should check:
- HA needs to be enabled on the vSphere Cluster
- DRS needs to be enabled and fully automated
- The vSphere Cluster needs to be equipped with a “VMware vSphere 7 Enterprise Plus with Add-on for Kubernetes” license key
- Enough Compute and Storage resources in the vSphere Cluster
- vSphere Distributed Switch version 7.0
- Trust enabled between NSX-T and vCenter on the Compute Manager object
- NTP configured and no time differences between all components
Supervisor Cluster stuck in configuring state
There are a few situations where your Supervisor Cluster enablement process gets stuck in “configuring” state, such as shown here.
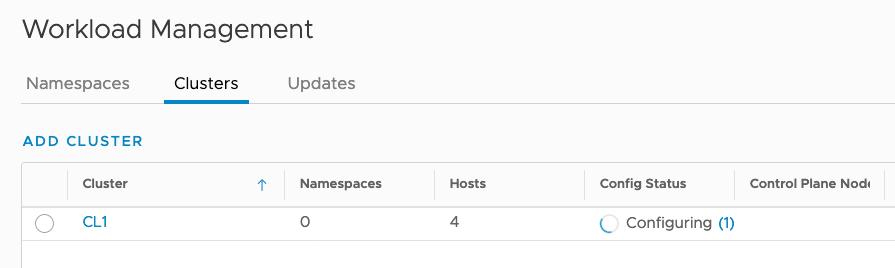
This problem can happen due to various misconfigurations, but here are the two most common causes I saw so far.
If your domain ends with .local or .corp, you need to make sure the domain is entered in the search domain section for the management network, during the Supervisor enablement process. Otherwise, this will lead to a crashing nsx-ncp pod on the Supervisor cluster due to a not working name resolution for the components on the management network.
Another issue can be NTP, as always. Double-check all components on time drifts and try to remove and re-enable the Supervisor Cluster after fixing it.
General Troubleshooting
If you run into issues, it is always worth to check the log files and execute a tail command while performing the failing task. The main log file for vSphere 7 with Kubernetes can be found on the VCSA here “/var/log/vmware/wcp/wcpsvc.log”.
tail -f /var/log/vmware/wcp/wcpsvc.log
For the NSX-T related logs you can check the following location on the VCSA:
tail -f /var/log/vmware/wcp/nsxd.log
There is also the possibility that you need to restart the vSphere 7 with Kubernetes service on the vCenter Server, aka the wcp service. This can be done via the following command:
vmon-cli -r wcp
Update 26.10.2020: Another log you should have a look at is the spherelet log on each host. I came across a problem where each ESXi hosts had no Hostname configured and were still referring to “localhost”. This situation led to an issue where only one worker node entry “localhost” was configured for the Supervisor Cluster. Looking at the spherelet log helped us to identify and fix the issue.
tail -f /var/log/spherelet.logWorkload Tips & Tricks
Storage Policy Name not DNS conformant
In vSphere 7 with Kubernetes, we are using Storage Policies to assign storage to Namespaces. Every Storage Policy assigned to a Namespace will be reflected as a Kubernetes StorageClass. If the Storage Policy name is not following DNS naming conventions, vSphere 7 with Kubernetes will sanitize the name and change it to a DNS conformant name. For example, I have created a Storage Policy “Gold Storage” and added it to the Ghost Namespace.

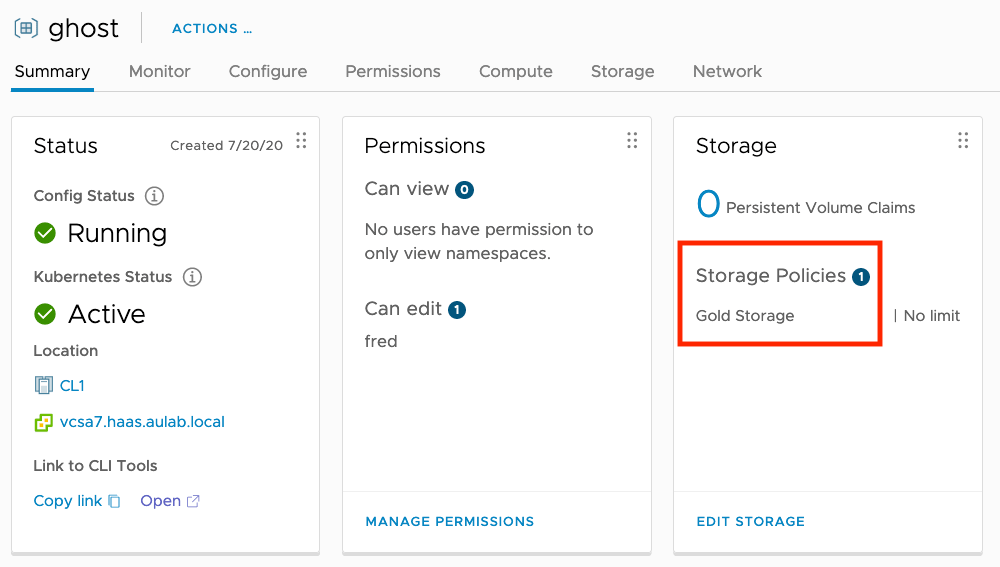
If we look at the Supervisor Cluster’s associated storage class, we will see that the name changed to “gold-storage”. To list the StorageClass, execute “kubectl get sc” as administrator@vsphere.local.
(⎈ |ghost:ghost)➜  ~ kubectl get sc
NAME                   PROVISIONER              RECLAIMPOLICY   VOLUMEBINDINGMODE   ALLOWVOLUMEEXPANSION   AGE
gold-storage           csi.vsphere.vmware.com   Delete          Immediate           true                   4h14m
However, a regular user with editor rights on the Namespace, cannot list the StorageClasses and will not know that the name is not equal to the Storage Policy in vSphere. We will get a “Forbidden” error message stating that the user cannot list the resource storageclasses.
(⎈ |ghost:ghost)➜  ~ kubectl get sc
Error from server (Forbidden): storageclasses.storage.k8s.io is forbidden: User "sso:fred@vsphere.local" cannot list resource "storageclasses" in API group "storage.k8s.io" at the cluster scope
As a side note, even though a normal user cannot list the StorageClasses, they actually can get the information by executing a “kubectl describe namespace namespacename”. The StorageClass will be listed under “Resource Quotas/Resource” as shown here.
(⎈ |ghost:ghost)➜  ~ kubectl describe namespace ghost
Name:         ghost
Labels:       vSphereClusterID=domain-c8
Annotations:  ncp/extpoolid: domain-c8:78c7b057-bf11-409c-9da6-4eab08940d6f-ippool-10-197-116-161-10-197-116-190
              ncp/snat_ip: 10.197.116.178
              ncp/subnet-0: 10.244.1.16/28
              vmware-system-resource-pool: resgroup-1173
              vmware-system-vm-folder: group-v1174
Status:       Active

Resource Quotas
 Name:                                                      ghost-storagequota
 Resource                                                   Used  Hard
 --------                                                   ---   ---
 gold-storage.storageclass.storage.k8s.io/requests.storage  0     9223372036854775807

No LimitRange resource.
Nevertheless, this is probably not common knowledge and could lead to a situation where the user tries to use the name of the vSphere Storage Policy in the PersistentVolumeClaim manifest, which will cause the following issue.
(⎈ |ghost:ghost)➜  ~ kubectl apply -f ghost-claim.yaml
The PersistentVolumeClaim "blog-content" is invalid: spec.storageClassName: Invalid value: "Gold Storage": a DNS-1123 subdomain must consist of lower case alphanumeric characters, '-' or '.', and must start and end with an alphanumeric character (e.g. 'example.com', regex used for validation is '[a-z0-9]([-a-z0-9]*[a-z0-9])?(\.[a-z0-9]([-a-z0-9]*[a-z0-9])?)*')
To fix this problem, we just need to exchange the storageClassName in the manifest from “Gold Storage” with the DNS sanitized name of the StorageClass on the Supervisor Cluster “gold-storage”. This will work now, but my general recommendation is to use DNS conformant names for your vSphere Storage Policies or provide the correct StorageClass name to your consumers.
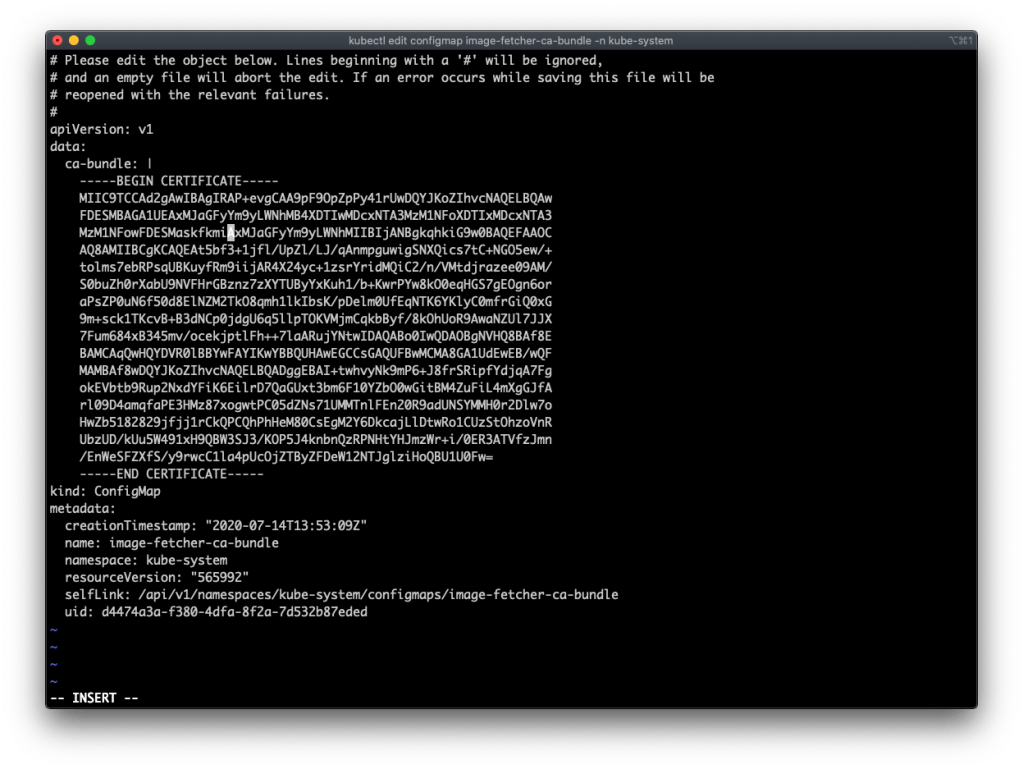
Configure external Registries with self-signed certificates
If you want to use an external Container Registry with a self-signed certificate, you need to edit the “image-fetcher-ca-bundle” configmap on the Supervisor Cluster and add the certificate. Simply start with logging on to your Supervisor Cluster with your administrator@vsphere.local credentials and the kubectl vsphere login command.
➜  ~ kubectl vsphere login --server=10.197.116.129 --insecure-skip-tls-verify

Username: administrator@vsphere.local
Password:
Logged in successfully.

You have access to the following contexts:
   10.197.116.129
   demo
   ghost

If the context you wish to use is not in this list, you may need to try
logging in again later, or contact your cluster administrator.

To change context, use `kubectl config use-context <workload name>`
(⎈ |10.197.116.129:default)➜  ~ kubectl edit configmap image-fetcher-ca-bundle -n kube-system
Ensure you are in the correct context and add the certificate of your container registry by executing the following command:
kubectl edit configmap image-fetcher-ca-bundle -n kube-system
Now we can pull images from the container registry with the self-signed certificate. In my case, I am using an external Harbor 2.0 registry. You can also use the embedded Harbor registry from vSphere 7 with Kubernetes. If you choose the embedded version, editing the image-fetcher-ca-bundle is not needed. However, the external open-source version of Harbor has some features available that are yet not available on the embedded variant (e.g., Vulnerability scanning).
Configure a Proxy for TKG Clusters or add “insecure” Registries
Kudos to my colleague Jose Manzaneque. He wrote two scripts for Tanzu Kubernetes Grid Clusters on vSphere 7 with Kubernetes. These scripts can configure proxy settings and add an insecure container registry to TKG clusters. You can find both scripts on Jose’s GitHub page here.
Update 26.10.2020: The scripts above might not work anymore as we moved from docker to containerd as the container runtime. However, there is an excellent proxy and certificate injector written by VMware’s Will Arroyo that will do the trick. You can find the git repo here.
Workloads not coming up on TKG Clusters
Tanzu Kubernetes Grid Clusters on vSphere 7 with Kubernetes have Pod Security Policies enabled per default. Every workload deployed on the cluster will fail, and no Pods will be created, unless you have a Pod Security Policy configured. If you do a kubectl describe on a replicaset, you will see the error message “unable to validate against any pod security policy”.
(⎈ |tkg-cluster-1:default)➜  ~ kubectl get pods -n harbor
No resources found in harbor namespace.
(⎈ |tkg-cluster-1:default)➜  ~ kubectl get deployments -n harbor
NAME                          READY   UP-TO-DATE   AVAILABLE   AGE
harbor-harbor-chartmuseum     0/1     0            0           71s
harbor-harbor-clair           0/1     0            0           71s
harbor-harbor-core            0/1     0            0           71s
harbor-harbor-jobservice      0/1     0            0           71s
harbor-harbor-nginx           0/1     0            0           71s
harbor-harbor-notary-server   0/1     0            0           71s
harbor-harbor-notary-signer   0/1     0            0           71s
harbor-harbor-portal          0/1     0            0           71s
harbor-harbor-registry        0/1     0            0           71s
(⎈ |tkg-cluster-1:default)➜  ~ kubectl get rs -n harbor
NAME                                     DESIRED   CURRENT   READY   AGE
harbor-harbor-chartmuseum-746778b68f     1         0         0       79s
harbor-harbor-clair-86569c66c            1         0         0       79s
harbor-harbor-core-5d5799c8d4            1         0         0       79s
harbor-harbor-jobservice-865457554f      1         0         0       79s
harbor-harbor-nginx-b986b5664            1         0         0       79s
harbor-harbor-notary-server-7d58bd6fcc   1         0         0       79s
harbor-harbor-notary-signer-7656d49d4d   1         0         0       79s
harbor-harbor-portal-658cb77bfb          1         0         0       79s
harbor-harbor-registry-759695764         1         0         0       79s
(⎈ |tkg-cluster-1:default)➜  ~ kubectl describe rs harbor-harbor-core-5d5799c8d4 -n harbor
Name:           harbor-harbor-core-5d5799c8d4
Namespace:      harbor
...
Events:
  Type     Reason        Age                  From                   Message
  ----     ------        ----                 ----                   -------
  Warning  FailedCreate  15s (x15 over 100s)  replicaset-controller  Error creating: pods "harbor-harbor-core-5d5799c8d4-" is forbidden: unable to validate against any pod security policy: []
There are two default Pod Security Policies that we can use out of the box, “vmware-system-privileged” and “vmware-system-restricted”. If you want to know more, have a look at the documentation here.
(⎈ |tkg-cluster-1:default)➜  ~ kubectl get psp
NAME                       PRIV    CAPS   SELINUX    RUNASUSER          FSGROUP     SUPGROUP    READONLYROOTFS   VOLUMES
vmware-system-privileged   true    *      RunAsAny   RunAsAny           RunAsAny    RunAsAny    false            *
vmware-system-restricted   false          RunAsAny   MustRunAsNonRoot   MustRunAs   MustRunAs   false            configMap,emptyDir,projected,secret,downwardAPI,persistentVolumeClaim
To make things easy, we can use the “vmware-system-privileged” policy and create a ClusterRole and ClusterRoleBinding, as shown in this example:
apiVersion: rbac.authorization.k8s.io/v1
kind: ClusterRole
metadata:
  name: psp:privileged
rules:
- apiGroups: ['policy']
  resources: ['podsecuritypolicies']
  verbs:     ['use']
  resourceNames:
  - vmware-system-privileged
---
apiVersion: rbac.authorization.k8s.io/v1
kind: ClusterRoleBinding
metadata:
  name: all:psp:privileged
roleRef:
  kind: ClusterRole
  name: psp:privileged
  apiGroup: rbac.authorization.k8s.io
subjects:
- kind: Group
  name: system:serviceaccounts
  apiGroup: rbac.authorization.k8s.io
After you have created the ClusterRole and ClusterRoleBinding, the workload can be deployed successfully. However, it is recommended to use Pod Security Policies in a more restricted way and create your Policies based on your requirements. If you want to learn more about Pod Security Policies, look at my blog post here or to the official Kubernetes documentation here.
Conclusion
My intention for this blog post is to help everyone who wanted to evaluate vSphere 7 with Kubernetes on their own. If you run into issues, try to use the described troubleshooting and verification steps to fix your problem. A lot of problems arise from miscommunication between different teams, and it is crucial to have the vSphere Team and the Network Team involved in the implementation of vSphere 7 with Kubernetes. Hence, my recommendation is easy, work as a team and go through the Network & NSX-T verification steps until the environment is up and running.
If you don’t have the time or the resources to implement vSphere 7 with Kubernetes for an evaluation, there is another option. VMware has a free Hands-on Lab available that can be used at any time. Look for the hands-on lab with the name “HOL-2113-01-SDC – vSphere 7 with Kubernetes” on the Hands-on Lab catalog here.
Sources
- vSphere 7 with Kubernetes official documentation
- vSphere 7 with Kubernetes official guide
- vSphere 7 with Kubernetes download
- Hand-on Labs catalog
- William Lam’s automated lab deployment script
- William Lam’s minimal vSphere with Kubernetes post
- William Lam’s forged transmit and promiscuous mode for nested ESXi post
- VMware’s support statement for nested environments
- NSX-T 3.x download
- NSX-T 3.x official documentation
- TKG scripts from Jose Manzaneque
- Kubernetes Pod Security Policies
- Harbor Container Registry
- vmkping kb article
- Object names in Kubernetes
- Kubernetes StorageClass

Leave a comment