
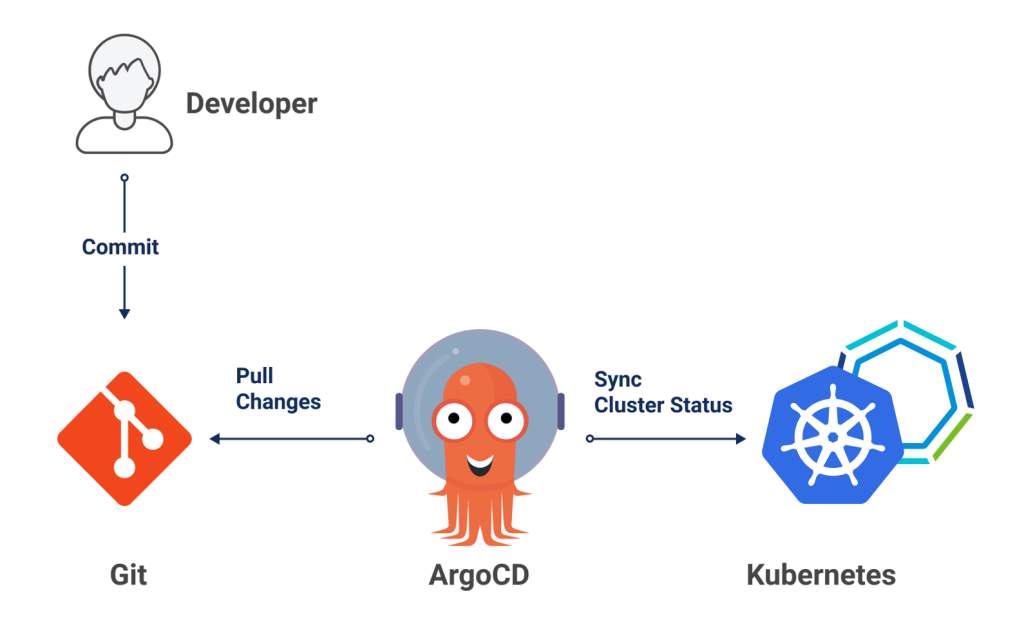
GitOps is a term that describes a set of Ops practices that allow for continuous deployment of applications and infrastructure configurations. The idea is to define configurations declaratively and use a Git-based repository as the single source of truth. Continuous Delivery tools such as Argo CD will permanently implement the desired state. Some of the advantages of such an approach are increased productivity through automation and standardization, better developer experience, and higher reliability. It will reduce mean time to recovery (MTTR) through easy redeployment.
I often come across situations where I need to install a set of tools or applications on top of multiple Kubernetes clusters. These situations are often POCs or workshops, but also when I have to redeploy my lab environments. My general approach is to use a “tools” cluster which provides some shared services or extensions such as Harbor as a Container Registry, Kubeapps as a Helm Chart Catalog, and Argo CD as the Continues Delivery tool. In this blog post, I want to describe how to use Argo CD, GitHub, and GitOps practices to deploy and configure Tanzu Kubernetes Grid Clusters (TKCs) and applications on top of vSphere with Tanzu.
Argo CD
Overview
Argo CD is part of the Argo CNCF incubating project and allows for declarative GitOps and continuous delivery of your applications and configurations. It is built for Kubernetes and continuously syncs your Git manifests with your cluster state. Additionally, it supports multiple manifest formats and tools such as Helm, Kustomize, Ksonnet, Jsonnet, and plain YAML.
At the time of writing this blog post, Argo CD has over 6500+ stars on GitHub and, according to the latest user survey, an excellent NPS score of 68. The latest available release is Argo CD 2.0, which we will use as part of our test installation.
Custom Resource Definitions
Everything you can create or configure in Argo CD can be done declaratively via Kubernetes manifests. Therefore Argo CD provides two Custom Resource Definitions (CRDs) for Applications and Projects.
(⎈ |tkg-tools-cl1:default)➜  ~ kubectl get crd  | grep argo

applications.argoproj.io
appprojects.argoproj.io
The Application CRD represents an application instance and specifies the source Git repository as well as the target cluster under destination:
apiVersion: argoproj.io/v1alpha1
kind: Application
metadata:
  name: guestbook
  namespace: argocd
spec:
  project: default
  source:
    repoURL: https://github.com/argoproj/argocd-example-apps.git
    targetRevision: HEAD
    path: guestbook
  destination:
    server: https://kubernetes.default.svc
    namespace: guestbook
The Project CRD represents a logical grouping of applications and resources. If multiple teams are working with the same Argo CD server, this becomes especially useful. Under sourceRepos, you can specify a list of repositories from which the project can pull manifests. All clusters a project can use are defined under destinations together with a whitelist of allowed cluster resources under clusterResourceWhitelist. Additional settings can be specified as part of the Project CRD, such as roles and namespace resources. A complete list can be found here.
apiVersion: argoproj.io/v1alpha1
kind: AppProject
metadata:
  name: my-project
  namespace: argocd
spec:
  sourceRepos:
  - '*'
  destinations:
  - namespace: '*'
    server: '*'
  clusterResourceWhitelist:
  - group: '*'
    kind: '*'
Installation
Argo CD can be easily deployed on any Kubernetes cluster. However, in this blog post, we will install Argo CD on vSphere with Tanzu and an already existing TKC. Follow the next steps to deploy Argo CD.
Make sure you are connected to your TKC cluster via the correct kubectl context and that you have access to the cluster with sufficient permissions. By the way, I will use the “kubectl whoami” plugin a few times in this blog post, and you can find it on GitHub here.
(⎈ |tkg-tools-cl1:default)➜  ~ kubectl config get-contexts
CURRENT   NAME             CLUSTER          AUTHINFO                                         NAMESPACE
          10.197.116.129   10.197.116.129   wcp:10.197.116.129:administrator@vsphere.local
*         tkg-tools-cl1    10.197.116.131   wcp:10.197.116.131:administrator@vsphere.local
          tools            10.197.116.129   wcp:10.197.116.129:administrator@vsphere.local   tools
          tsm-ns1          10.197.116.129   wcp:10.197.116.129:administrator@vsphere.local   tsm-ns1
(⎈ |tkg-tools-cl1:default)➜  ~ kubectl get ns
NAME                           STATUS   AGE
default                        Active   5d4h
kube-node-lease                Active   5d4h
kube-public                    Active   5d4h
kube-system                    Active   5d4h
vmware-system-auth             Active   5d4h
vmware-system-cloud-provider   Active   5d4h
vmware-system-csi              Active   5d4h
(⎈ |tkg-tools-cl1:default)➜  ~ kubectl whoami
Current user: wcp:10.197.116.131:administrator@vsphere.local
(⎈ |tkg-tools-cl1:default)➜  ~ kubectl auth can-i '*' '*'
yes
Now create a Namespace “argocd” and apply the Argo CD manifest. It will automatically use the latest stable release.
(⎈ |tkg-tools-cl1:default)➜  ~ kubectl create ns argocd
namespace/argocd created
(⎈ |tkg-tools-cl1:default)➜  ~ kubectl apply -n argocd -f https://raw.githubusercontent.com/argoproj/argo-cd/stable/manifests/install.yaml
customresourcedefinition.apiextensions.k8s.io/applications.argoproj.io created
customresourcedefinition.apiextensions.k8s.io/appprojects.argoproj.io created
serviceaccount/argocd-application-controller created
serviceaccount/argocd-dex-server created
serviceaccount/argocd-redis created
serviceaccount/argocd-server created
role.rbac.authorization.k8s.io/argocd-application-controller created
role.rbac.authorization.k8s.io/argocd-dex-server created
role.rbac.authorization.k8s.io/argocd-redis created
role.rbac.authorization.k8s.io/argocd-server created
clusterrole.rbac.authorization.k8s.io/argocd-application-controller created
clusterrole.rbac.authorization.k8s.io/argocd-server created
rolebinding.rbac.authorization.k8s.io/argocd-application-controller created
rolebinding.rbac.authorization.k8s.io/argocd-dex-server created
rolebinding.rbac.authorization.k8s.io/argocd-redis created
rolebinding.rbac.authorization.k8s.io/argocd-server created
clusterrolebinding.rbac.authorization.k8s.io/argocd-application-controller created
clusterrolebinding.rbac.authorization.k8s.io/argocd-server created
configmap/argocd-cm created
configmap/argocd-gpg-keys-cm created
configmap/argocd-rbac-cm created
configmap/argocd-ssh-known-hosts-cm created
configmap/argocd-tls-certs-cm created
secret/argocd-secret created
service/argocd-dex-server created
service/argocd-metrics created
service/argocd-redis created
service/argocd-repo-server created
service/argocd-server created
service/argocd-server-metrics created
deployment.apps/argocd-dex-server created
deployment.apps/argocd-redis created
deployment.apps/argocd-repo-server created
deployment.apps/argocd-server created
statefulset.apps/argocd-application-controller created
networkpolicy.networking.k8s.io/argocd-application-controller-network-policy created
networkpolicy.networking.k8s.io/argocd-dex-server-network-policy created
networkpolicy.networking.k8s.io/argocd-redis-network-policy created
networkpolicy.networking.k8s.io/argocd-repo-server-network-policy created
networkpolicy.networking.k8s.io/argocd-server-network-policy created
Check if all pods are up and running. If you see no Pods coming up, make sure you have Pod Security Policies configured as they are enabled per default on every TKC. See the following documentation for more details.
If you see the Redis pod getting in an “ImagePullBackOff”, you likely hit the Docker rate limit as this image is getting pulled from Docker Hub.
(⎈ |tkg-tools-cl1:default)➜  ~ kubectl get pods -n argocd
NAME                                  READY   STATUS             RESTARTS   AGE
argocd-application-controller-0       1/1     Running            0          2m1s
argocd-dex-server-76ff776f97-r5l4p    1/1     Running            2          2m4s
argocd-redis-747b678f89-vnf87         0/1     ImagePullBackOff   0          2m3s
argocd-repo-server-6fc4456c89-7gqzq   1/1     Running            0          2m2s
argocd-server-7d57bc994b-gmvnl        1/1     Running            0          2m2s
No worries, create a Docker registry secret with your Docker Hub account and patch the Redis service account with an ImagePullSecret. If you don’t have a Docker Hub account, you can register here.
(⎈ |tkg-tools-cl1:default)➜  ~ kubectl create secret docker-registry regcred --docker-server=https://index.docker.io/v2/ --docker-username=yourusername --docker-password=yourpassword --docker-email=your.email@mail.com -n argocd
secret/regcred created
(⎈ |tkg-tools-cl1:default)➜  ~ kubectl -n argocd patch serviceaccount argocd-redis -p '{"imagePullSecrets": [{"name": "regcred"}]}'
serviceaccount/argocd-redis patched
After you have patched the service account, delete the existing Redis pod to trigger a recreation. It will successfully pull the image and start the pod.
(⎈ |tkg-tools-cl1:default)➜  ~ kubectl -n argocd delete pod argocd-redis-747b678f89-vnf87
pod "argocd-redis-747b678f89-vnf87" deleted
(⎈ |tkg-tools-cl1:default)➜  ~ kubectl get pods -n argocd
NAME                                  READY   STATUS    RESTARTS   AGE
argocd-application-controller-0       1/1     Running   0          18m
argocd-dex-server-76ff776f97-r5l4p    1/1     Running   2          18m
argocd-redis-747b678f89-m8rrj         1/1     Running   0          7s
argocd-repo-server-6fc4456c89-7gqzq   1/1     Running   0          18m
argocd-server-7d57bc994b-gmvnl        1/1     Running   0          18m
As a next step, we want to expose the argocd-server service to reach it from the outside. We can patch the service and make it a type LoadBalancer that automatically assigns an external IP address.
(⎈ |tkg-tools-cl1:default)➜  ~ kubectl patch svc argocd-server -n argocd -p '{"spec": {"type": "LoadBalancer"}}'
service/argocd-server patched
(⎈ |tkg-tools-cl1:default)➜  ~ kubectl get svc -n argocd
NAME                    TYPE           CLUSTER-IP       EXTERNAL-IP      PORT(S)                      AGE
argocd-dex-server       ClusterIP      10.105.235.13    <none>           5556/TCP,5557/TCP,5558/TCP   27m
argocd-metrics          ClusterIP      10.103.184.167   <none>           8082/TCP                     27m
argocd-redis            ClusterIP      10.100.69.189    <none>           6379/TCP                     27m
argocd-repo-server      ClusterIP      10.99.97.54      <none>           8081/TCP,8084/TCP            27m
argocd-server           LoadBalancer   10.96.253.109    10.197.116.133   80:31730/TCP,443:31990/TCP   27m
argocd-server-metrics   ClusterIP      10.100.213.109   <none>           8083/TCP                     27m
The initial password is randomly created and can be retrieved via the following command and secret.
(⎈ |tkg-tools-cl1:default)➜  ~ kubectl -n argocd get secret argocd-initial-admin-secret -o jsonpath="{.data.password}" | base64 -d
BWXpnzezhbMGvHoI%
To change the password, we need to install the argocd cli first. The installation can be done via Homebrew (brew install argocd) if you are a MAC user. Other options can be found here.
After installing the argocd cli, simply login with “admin” to the argocd server via the external IP assigned earlier and run the update-password command to change the password.
(⎈ |tkg-tools-cl1:default)➜  ~ argocd login 10.197.116.133
WARNING: server certificate had error: x509: cannot validate certificate for 10.197.116.133 because it doesn't contain any IP SANs. Proceed insecurely (y/n)? y
Username: admin
Password:
'admin:login' logged in successfully
Context '10.197.116.133' updated
(⎈ |tkg-tools-cl1:default)➜  ~ argocd account update-password
*** Enter current password:
*** Enter new password:
*** Confirm new password:
Password updated
Context '10.197.116.133' updated
Installation completed, we can finally login to the Argo CD UI and continue from there.

Add additional TKCs
Now that we have Argo CD server running on our Tools TKC, we want to add further TKCs as additional deployment targets. The idea is to use a central Argo CD instance to deploy applications and configurations to all Kubernetes clusters in our environment.
To add a TKC to Argo CD, we have to use the “argocd cluster add” command while specifying the kubectl context of the cluster we want to add. Make sure you have sufficient permissions as well. The process will try to create a service account with cluster-wide permissions. Also, make sure your argocd cli login is still valid.
(⎈ |tkg-tools-cl1:default)➜  ~ kubectl config use-context tkg-cl1
Switched to context "tkg-cl1".
(⎈ |tkg-cl1:default)➜  ~ kubectl whoami
Current user: wcp:10.197.116.135:administrator@vsphere.local
(⎈ |tkg-cl1:default)➜  ~ kubectl auth can-i '*' '*'
yes
(⎈ |tkg-cl1:default)➜  ~ argocd login 10.197.116.133
WARNING: server certificate had error: x509: cannot validate certificate for 10.197.116.133 because it doesn't contain any IP SANs. Proceed insecurely (y/n)? yes
Username: admin
Password:
'admin:login' logged in successfully
Context '10.197.116.133' updated
(⎈ |tkg-tools-cl1:default)➜  ~ argocd cluster add tkg-cl1
INFO[0000] ServiceAccount "argocd-manager" created in namespace "kube-system"
INFO[0000] ClusterRole "argocd-manager-role" created
INFO[0001] ClusterRoleBinding "argocd-manager-role-binding" created
Cluster 'https://10.197.116.135:6443' added
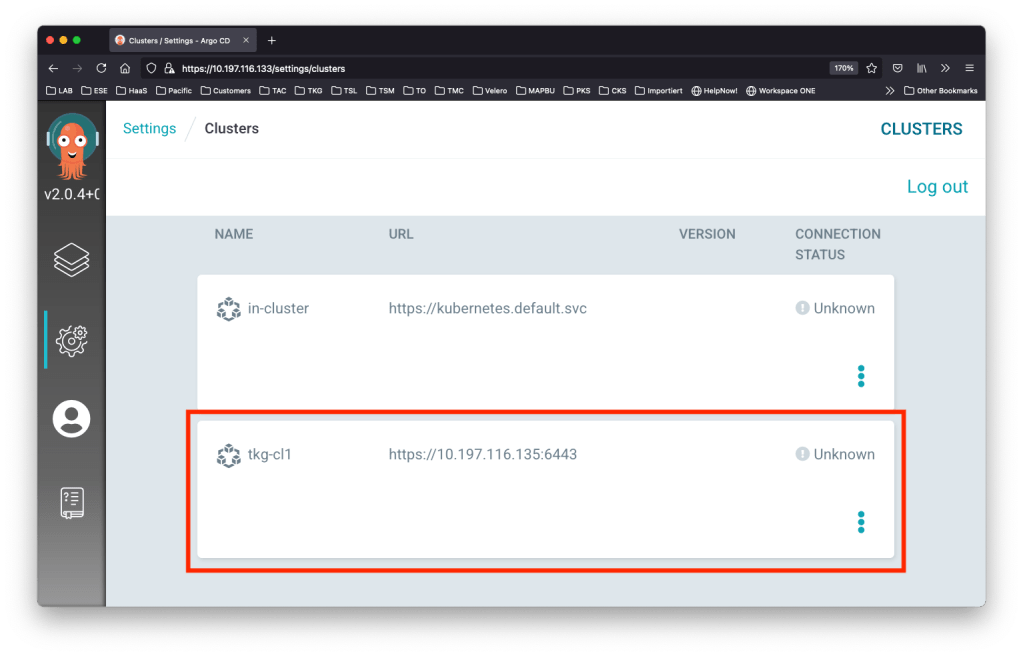
As you can see, we have a new TKC in the Clusters view of Argo CD. The process created a ClusterRole and ClusterRoleBinding with full cluster access for the service account “argocd-manager”. Permissions for the service account can be more restricted with only cluster-wide read access and write access to specific namespaces. Read more about the security aspects of Argo CD here.
Note: If you add Kubernetes cluster based on Antrea, you might see the following error when deploying an application via Argo CD:
“NetworkPolicy.networking.antrea.tanzu.vmware.com: json: error calling MarshalJSON for type *intstr.IntOrString: impossible IntOrString.Type”.
This is a known issue that is already addressed as part of the GitHub fix discussed here. As a workaround, you have to create an exclusion for the following API groups or use an Antrea version that has the fix.
- networking.antrea.tanzu.vmware.com
- controlplane.antrea.tanzu.vmware.com
- controlplane.antrea.io
Add Supervisor Cluster
Fine, we have added TKCs to Argo CD, but what about the Supervisor Cluster? I might want to use Argo CD to deploy TKCs, Native Pods, or VMs, so how can we add it?
As we learned from above, Argo CD uses a service account with cluster-wide permissions. Even as a vSphere administrator, we cannot create these permissions on the Supervisor Cluster. Hence, we need to use a little trick and access one of the Supervisor Cluster nodes as root to achieve this. To do so, ssh into the VCSA first and execute the “decryptK8Pwd.py” under “/usr/lib/vmware-wcp/” to gather the ssh password.
Please note: Accessing the Supervisor Cluster nodes via the described way is not supported by VMware, and changes made via this process may lead to an unsupported and dysfunctional cluster.
(⎈ |tools:tools)➜  ~ ssh root@vcsa7.haas.aulab.local
The authenticity of host 'vcsa7.haas.aulab.local (10.197.79.119)' can't be established.
ECDSA key fingerprint is SHA256:UdwRFa0C2kEU/EWNdPNmHw2iu3X5Rl15U6aSFqtbEFw.
Are you sure you want to continue connecting (yes/no/[fingerprint])? yes
Warning: Permanently added 'vcsa7.haas.aulab.local' (ECDSA) to the list of known hosts.

VMware vCenter Server 7.0.2.00200

Type: vCenter Server with an embedded Platform Services Controller

root@vcsa7.haas.aulab.local's password:
root@vcsa7 [ ~ ]# cd /usr/lib/vmware-wcp/
root@vcsa7 [ /usr/lib/vmware-wcp ]# ls
day0_patching            firstboot         jwt_session.py            nsxd                   __pycache__    roles.xml  wcp-db-dump.py          wcpsvc
decrypt_clustervm_pw.py  hdcs_db_init.sql  nsop-roles.xml            nsx_policy_cleanup.py  py-modules     spherelet  wcp_db_init.sql         wcpsvc.launcher
decryptK8Pwd.py          imgcust           nsservice-privileges.xml  privileges.xml         relink_nsx.py  wcpagent   wcp-ls-spec.properties  wcpsvc-prestart.py
root@vcsa7 [ /usr/lib/vmware-wcp ]# ./decryptK8Pwd.py
Read key from file

Connected to PSQL

Cluster: domain-c8:d8a0baac-c862-4ad3-b645-d0d25766c8d2
IP: 10.197.79.113
PWD: +mTEczjvQf4eiDRlPK7gxbDQ8q+L4tbEiSbjAG0QmrZMMhWa+eh/7tUc4UnryrTz0DrCr3qk2aIuaxm1BK0OUDsCBCtDakxnPM3+4dnqgLvCt7tS3oOPGU9Flln9ecX6FMy4hfSD5ApTCPBBZbZ2cCC3RzDgOuNa+kNnqDCsA/Y=
------------------------------------------------------------
Before we ssh into the Supervisor Cluster node, think about your environment and where you want to place the service account that Argo CD will use to connect to the Supervisor Cluster. The service account needs to be created within a user-defined namespace that is accessible as a vSphere authenticated user (e.g., administrator@vsphere.local). Otherwise, it will cause problems during the cluster attach process, as argocd cli will try to read the service account secret (token). As an example, even the administrator@vsphere.local cannot read secrets in the kube-system namespace:
(⎈ |tools:tools)➜  ~ kubectl whoami
Current user: wcp:10.197.116.129:administrator@vsphere.local
(⎈ |tools:tools)➜  ~ kubectl auth can-i list secrets --namespace tools
yes
(⎈ |tools:tools)➜  ~ kubectl auth can-i list secrets --namespace kube-system
no
I will use the “tools” Namespace in which the TKC with the Argo CD installation resides. This will hopefully stop me from accidentally deleting the namespace and the service account with it.
As a next step, we can ssh into one of the Supervisor Control Plane nodes with the password we just received and create the necessary service account and RBAC resources.
root@42225892705f2a7cf7af938d916c30d1 [ ~ ]# kubectl create sa argocdsa -n tools
serviceaccount/argocdsa created
root@42225892705f2a7cf7af938d916c30d1 [ ~ ]# kubectl get sa argocdsa -n tools
NAME       SECRETS   AGE
argocdsa   1         12s
Now we have to grant permissions to our service account. We will only use read permissions on the cluster and full access on the namespace level. All yaml files that we will use for this task can be found under the GitHub repository for this blog post here.
The ClusterRole will include get, list, and watch for all resources on the TKC and looks a follows:
apiVersion: rbac.authorization.k8s.io/v1
kind: ClusterRole
metadata:
  creationTimestamp: null
  name: argo-cluster-read
rules:
- apiGroups:
  - '*'
  resources:
  - '*'
  verbs:
  - get
  - list
  - watch
The Role for the namespace has full access to all resources within the namespace (Make sure to change the namespace based on your environment):
apiVersion: rbac.authorization.k8s.io/v1
kind: Role
metadata:
  creationTimestamp: null
  name: argo-ns-full
  namespace: tools
rules:
- apiGroups:
  - "*"
  resources:
  - '*'
  verbs:
  - '*'
We will now apply the yaml files to create the roles and then use imperative commands to create the associated bindings with the service account quickly.
root@42225892705f2a7cf7af938d916c30d1 [ ~ ]# kubectl apply -f svc-clusterrole-read.yaml
clusterrole.rbac.authorization.k8s.io/argo-cluster-read created
root@42225892705f2a7cf7af938d916c30d1 [ ~ ]# kubectl apply -f svc-ns-role-full.yaml
role.rbac.authorization.k8s.io/argo-ns-full created
root@42225892705f2a7cf7af938d916c30d1 [ ~ ]# kubectl create clusterrolebinding argo-cluster-read-argocdsa --clusterrole=argo-cluster-read --serviceaccount=tools:argocdsa
clusterrolebinding.rbac.authorization.k8s.io/argo-cluster-read-argocdsa created
root@42225892705f2a7cf7af938d916c30d1 [ ~ ]# kubectl create rolebinding argo-ns-full-argocdsa --role=argo-ns-full --serviceaccount=tools:argocdsa -n tools
rolebinding.rbac.authorization.k8s.io/argo-ns-full-argocdsa created
Let’s quickly test if we can create resources in the tools namespace but not cluster-wide with the “kubectl auth can-i” command.
root@42225892705f2a7cf7af938d916c30d1 [ ~ ]# kubectl auth can-i create pods --as=system:serviceaccount:tools:argocdsa -n tools
yes
root@42225892705f2a7cf7af938d916c30d1 [ ~ ]# kubectl auth can-i create pods --as=system:serviceaccount:tools:argocdsa
no
Ok, we are almost done. Last but not least, we have to add the Supervisor Cluster via the argocd cli by specifying the service account and namespace we used before.
(⎈ |tools:tools)➜  ~ argocd login 10.197.116.133
WARNING: server certificate had error: x509: cannot validate certificate for 10.197.116.133 because it doesn't contain any IP SANs. Proceed insecurely (y/n)? y
Username: admin
Password:
'admin:login' logged in successfully
Context '10.197.116.133' updated
(⎈ |tools:tools)➜  ~ argocd cluster add 10.197.116.129 --service-account argocdsa --system-namespace tools
Cluster 'https://10.197.116.129:6443' added
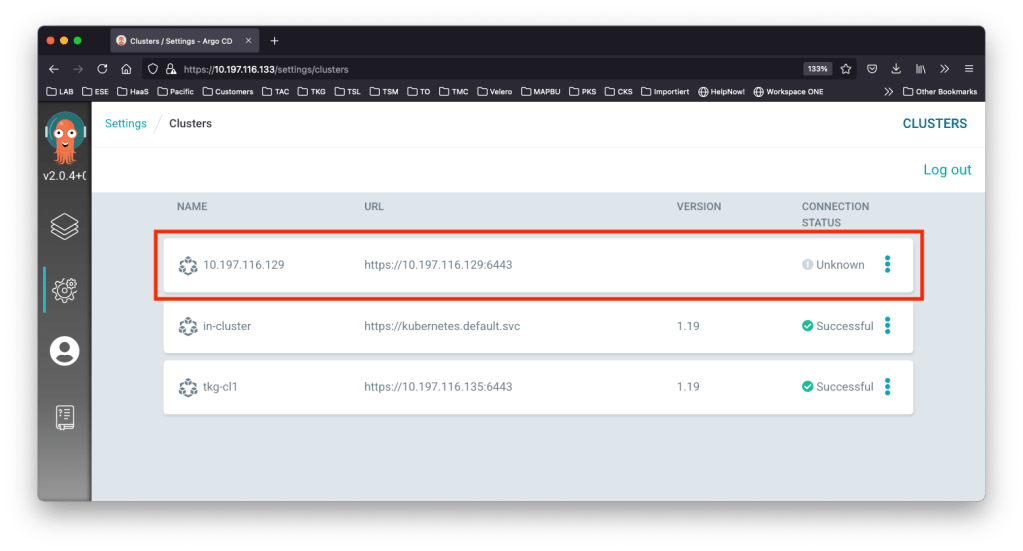
Now we can finally use the Supervisor Cluster to deploy TKCs, NativePods, or VMs via Argo CD.
Deploy a TKC via Argo CD
To deploy a TKC via Argo CD, we need to add a repository with a TKC manifest to Argo CD and create an application from it. We can perform this task via the UI, CLI, or via declarative yaml files.
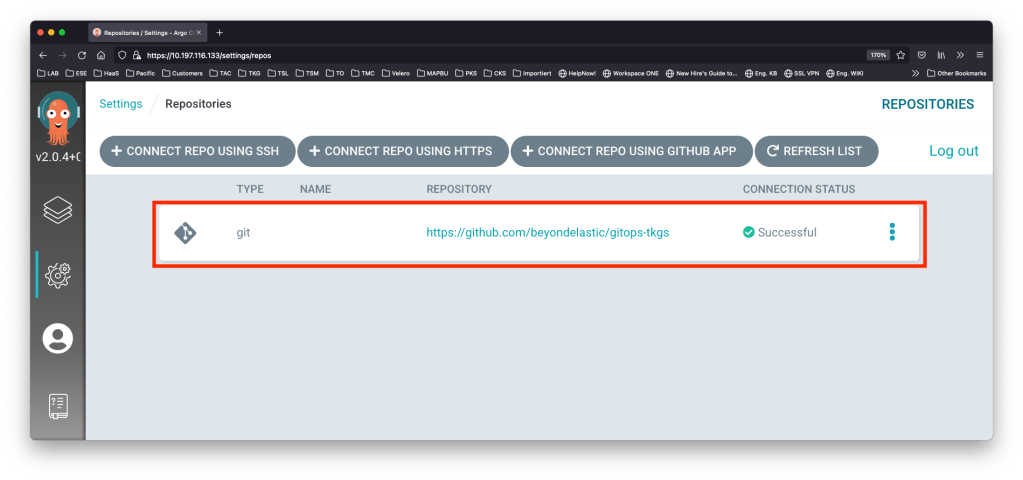
Let’s add our Github repo via the argocd cli and see how the change will be reflected in the argocd configmap on the TKC where Argo CD is running.
(⎈ |tkg-tools-cl1:default)➜  ~ argocd repo add https://github.com/beyondelastic/gitops-tkgs
Repository 'https://github.com/beyondelastic/gitops-tkgs' added
(⎈ |tkg-tools-cl1:default)➜  ~ kubectl get cm argocd-cm -n argocd -o yaml
apiVersion: v1
data:
  repositories: |
    - type: git
      url: https://github.com/beyondelastic/gitops-tkgs
kind: ConfigMap
metadata:
...
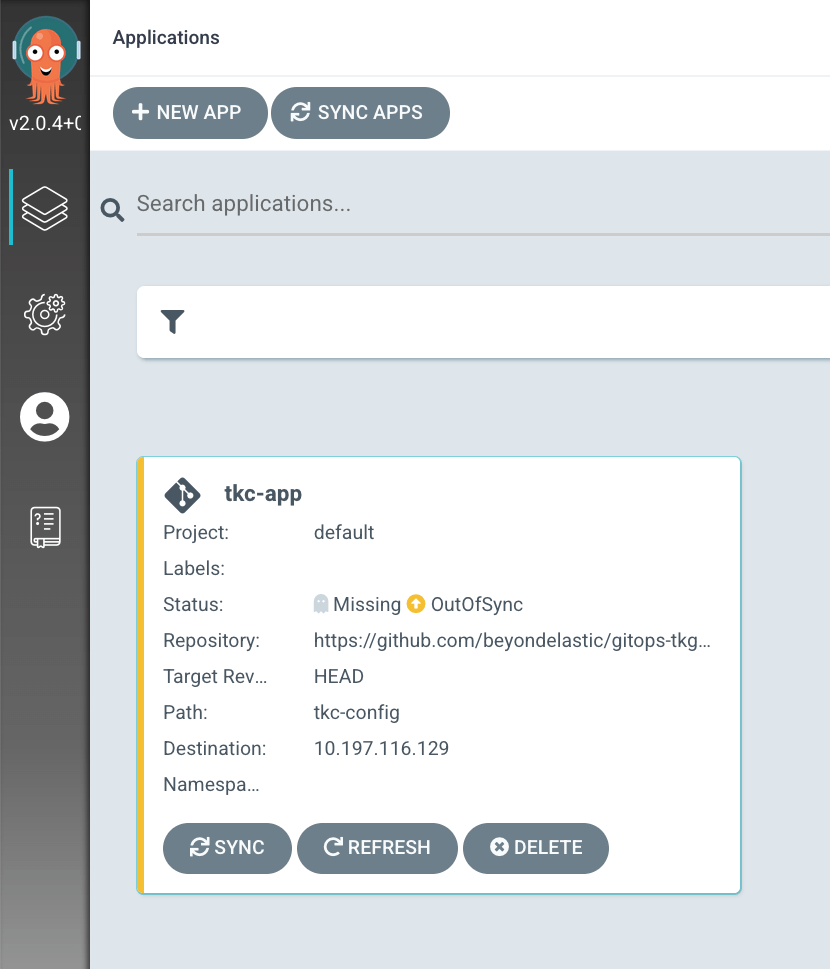
Now that we have added our repository, we can create an application based on it. This time we will use a pre-created yaml file for it. But again, you could also use the argocd cli or the UI. The essential values you need to edit are:
- server: Specify the address of your Supervisor cluster here
- path: The path to the TKC manifest in your repo needs to be defined here
- repoURL: Define your Git based repository here
My Argo CD application manifest for a TKC looks as follows:
apiVersion: argoproj.io/v1alpha1
kind: Application
metadata:
  name: tkc-app
  namespace: argocd
spec:
  destination:
    server: 10.197.116.129
  project: default
#  syncPolicy:
#    automated:
#      prune: false
#      selfHeal: false
  source:
    path: tkg-config
    repoURL: https://github.com/beyondelastic/gitops-tkgs.git
    targetRevision: HEAD
Note: I have disabled the section for automated synchronization on purpose as I want this to be manual. Feel free to change it if you want the synchronization to happen right after applying the manifest.
(⎈ |tkg-tools-cl1:default)➜  ~ kubectl apply -f tkc-app.yaml
application.argoproj.io/tkc-app created
(⎈ |tkg-tools-cl1:default)➜  ~ kubectl get application -n argocd
NAME      SYNC STATUS   HEALTH STATUS
tkc-app   OutOfSync     Missing
After applying the manifest, we will see the application popping up in the Argo CD UI.
Last but not least, we need to click on the “SYNC” button and on “SYNCHRONIZE” to start the deployment.
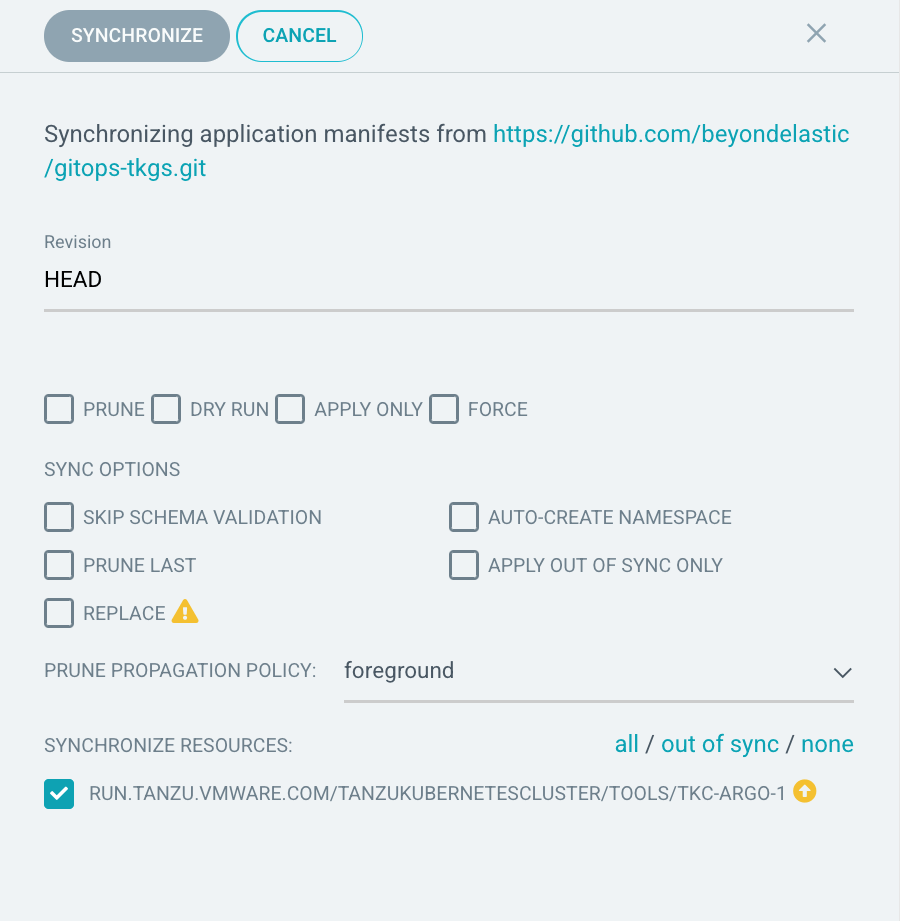
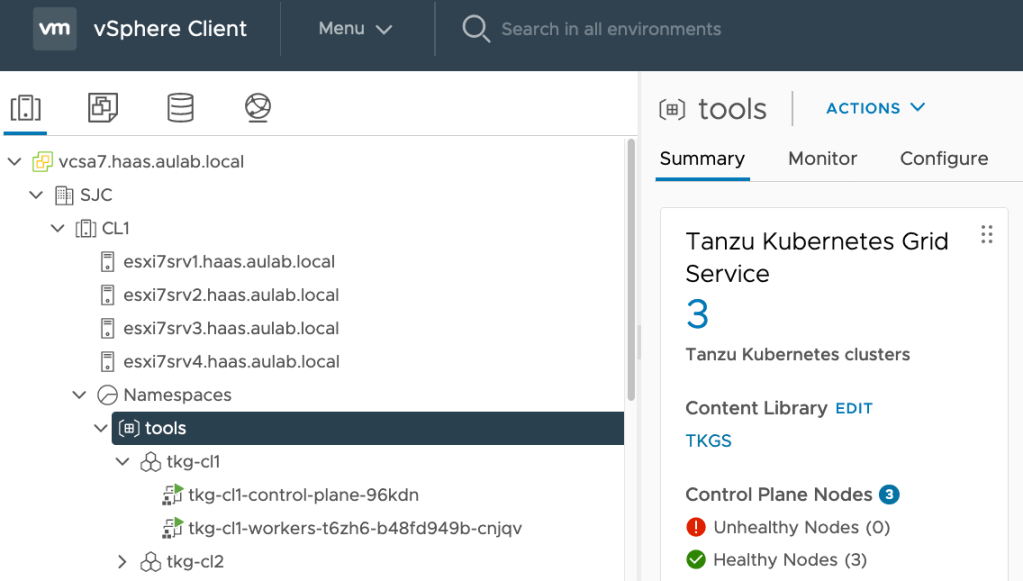
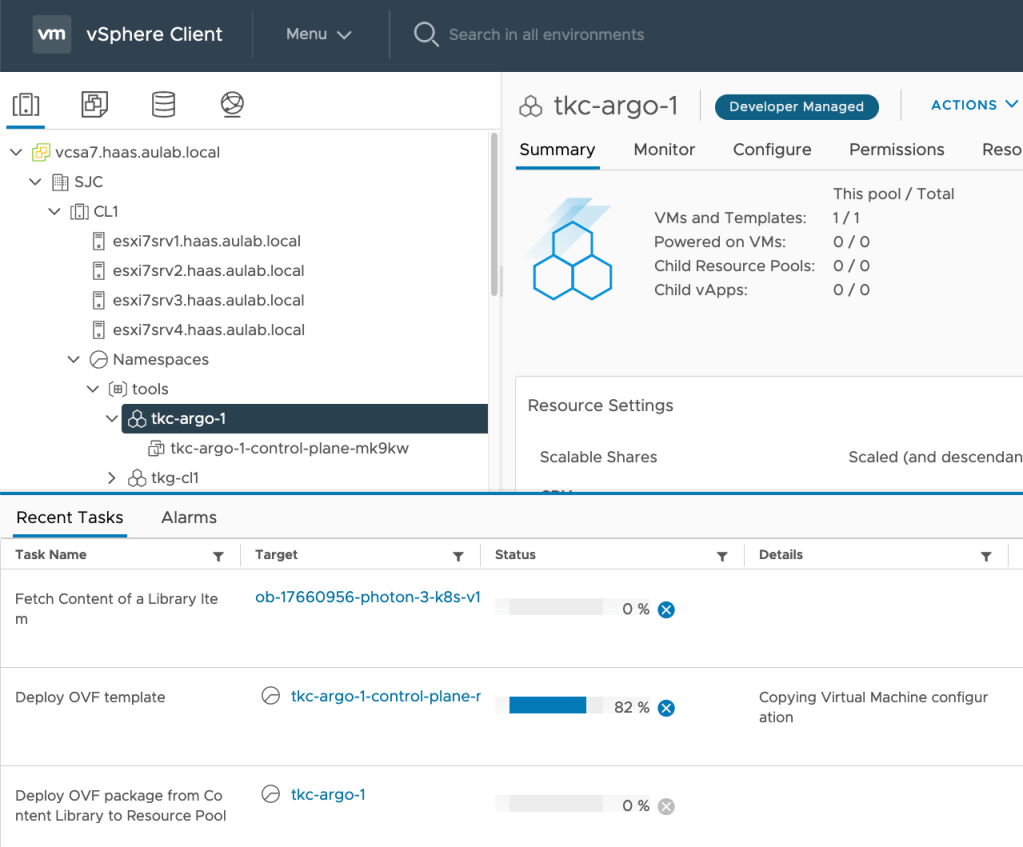
We can follow the sync/deployment process via the UI and vSphere Client.
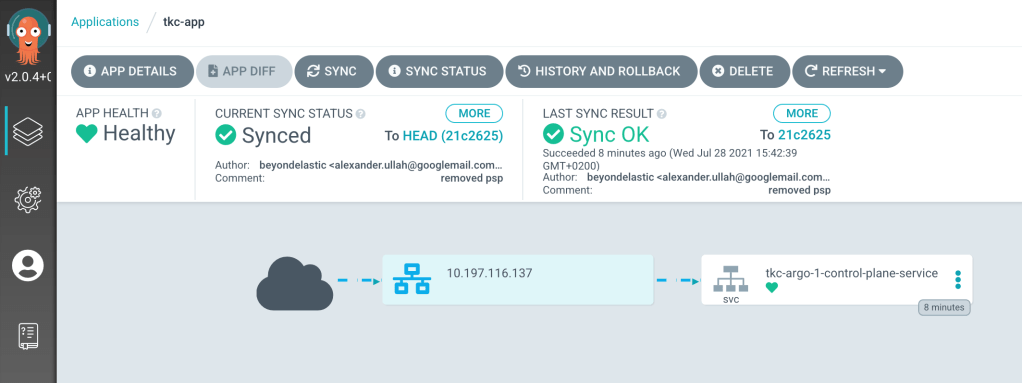
Done, we have successfully deployed Argo CD, added a TKC and the Supervisor Cluster to it, and deployed a TKC via Argo CD.
Conclusion
Argo CD is a great Open Source project, and using it as a central continuous delivery tool can make your cluster provisioning and operations much more effortless. IT can be used to continuously sync applications with your TKCs but also for deploying and configuring the TKCs themselves. Let alone the benefit of avoiding configuration drifts and having a single source of truth from where everything can be redeployed is a must-have for today’s IT departments.
Sources
- Argo CD landing page
- Argo CD GitHub repo
- Argo CNCF incubating project
- Argo CD user survey
- Argo CD 2.0 released
- Argo CD declarative setup
- Argo CD projects documentation
- Argo CD cli install documentation
- Argo CD security documentation
- Argo CD cluster add documentation
- Argo CD auto sync documentation
- GitHub repo Argo CD example apps
- GitHub repo for this blog post
- vSphere with Tanzu – Pod Security Policies documentation
- Kubectl whoami plugin

Leave a comment