

I have decided to test and play around with NSX-T in my homelab. In this blog post I would like to share my experience and describe the process I went through.
One of the main differences between NSX-V and NSX-T is that NSX-T is decoupled from vCenter and can be used with KVM deployments as well. This also enables a faster task execution for high churn environments (e.g. OpenStack or Kubernetes deployments) as you are no longer bound to what vCenter can process in parallel. Another big difference I wanna point out here is, that NSX-T is using GENEVE (Generic Network Virtualization Encapsulation) instead of VXLAN as the network encapsulation protocol. Geneve has a variable header length to include metadata information and is co-authored by VMware, Microsoft, RedHat, and Intel.
I have a pretty simple Homelab environment with 2 Clusters (Management and Payload). The Management Cluster is basically one Intel NUC with 32 GB RAM, a local SSD and 2 network interfaces. The Payload cluster consists of 3x Shuttle DS81 with 16GB each, a hybrid vSAN configuration and 2 network interfaces as well.

As you can see, I have already installed the necessary NSX-T components. By the way, you can make use of NSX-V and NSX-T within the same vCenter but obviously, you have to use different vSphere Clusters as NSX-T is using N-VDS (previously known as hostswitch) instead of the Distributed vSwitch that NSX-V uses.
1. Install NSX-T Manager & Controller
The first step is obviously to install the NSX-T Manager and Controller which is done via pretty straightforward OVA deployments. I have selected the “Small” form factor size for the NSX-T Manager with 2vCPUs and 8GB memory. The NSX-T Controller deployment in 2.1 divers from the NSX-V implementation where you need to deploy the NSX-T Controllers via OVA as well, instead of deploying it via the WebClient plugin that was available for NSX-V. Update: NSX-T 2.2 comes with an automatic Controller deployment workflow within the NSX-T Manager UI, so no need to do it via OVA deployment anymore. Step 2 and 3 can be skipped as well if you are using the automatic Controller cluster deployment from NSX-T 2.2.
Because of limited resources in my Homelab I have deployed only one NSX-T Controller and reduced its size to 2vCPUs and 8GB RAM. Important note! This is not a VMware recommended implementation, due to availability and scalability reasons you should have 3 Controllers in your NSX-T Controller Cluster and use the recommended memory and CPU configuration for all components. The NSX-T Edge VM can be deployed via OVA, via the NSX Manager UI or via CLI. I used the simple way via the NSX Manager UI which I will describe later. Also important to know is that with NSX-T there is another form factor for the Edge, you can choose to deploy it on bare metal to achieve higher N/S throughput.
2. Connect the NSX-T Manager with Controller
Step two is to connect the NSX-T Manager with the NSX-T Controller. Skip this step if you are using the automatic Controller deployment from NSX-T 2.2 within the NSX Manager UI. Therefore, we need to get the certificate thumbprint from the NSX-T Manager. Connect to the NSX-T Manager via ssh, start the NSX CLI and execute the following command:
get certificate API thumbprint
Copy the thumbprint and connect to the NSX-T Controller vis ssh, start NSX CLI and execute the following command: “
join management-plane username admin thumbprint <thumbprint>

Execute command: get managers to verify the Controller is connected to the Manager.

The connection between Controller and Manager is established but the Controller is not yet ready.
3. Initialize the Controller Cluster
This step can be skipped as well if you are using the automatic Controller deployment from within the NSX Manager UI of NSX-T 2.2. During Step three, we need to initialize the Controller Cluster, btw. this is also necessary if you just set up a small POC with one Controller node. In order to do so, we need to create a shared secret first. Execute the following command on the NSX-T Controller:
set control-cluster security-model shared-secret secret <secret>
 Now we are ready to initialize the Cluster, type:
 initialize control-cluster

Controller Cluster is up and running, so what is next?
4. Host preparation
First of all, we need to add a Compute Manager which is the vCenter that contains the hosts we would like to prepare. This is very simple and can be done via the NSX Manager UI.

After the first inventory scan, you should see the Clusters and ESX Hosts under Fabric/Hosts. From there you can do the host preparation and install the NSX-T VIBs. By the way, you can also select to automatically prepare/configure a whole cluster. Important note, the only thing you need to watch out for is that there are no remaining NSX-V VIBs installed. If that is the case, the installation will fail.

5. Deploy NSX-T Edge VM
The last major installation task is to deploy an Edge VM. The Edge VM can be performed via NSX-T Manager UI or per vSphere OVA deployment. To keep it simple I have used the NSX-T Manager UI. Go to Fabric/Nodes/Edges and click on “Add Edge VM”.
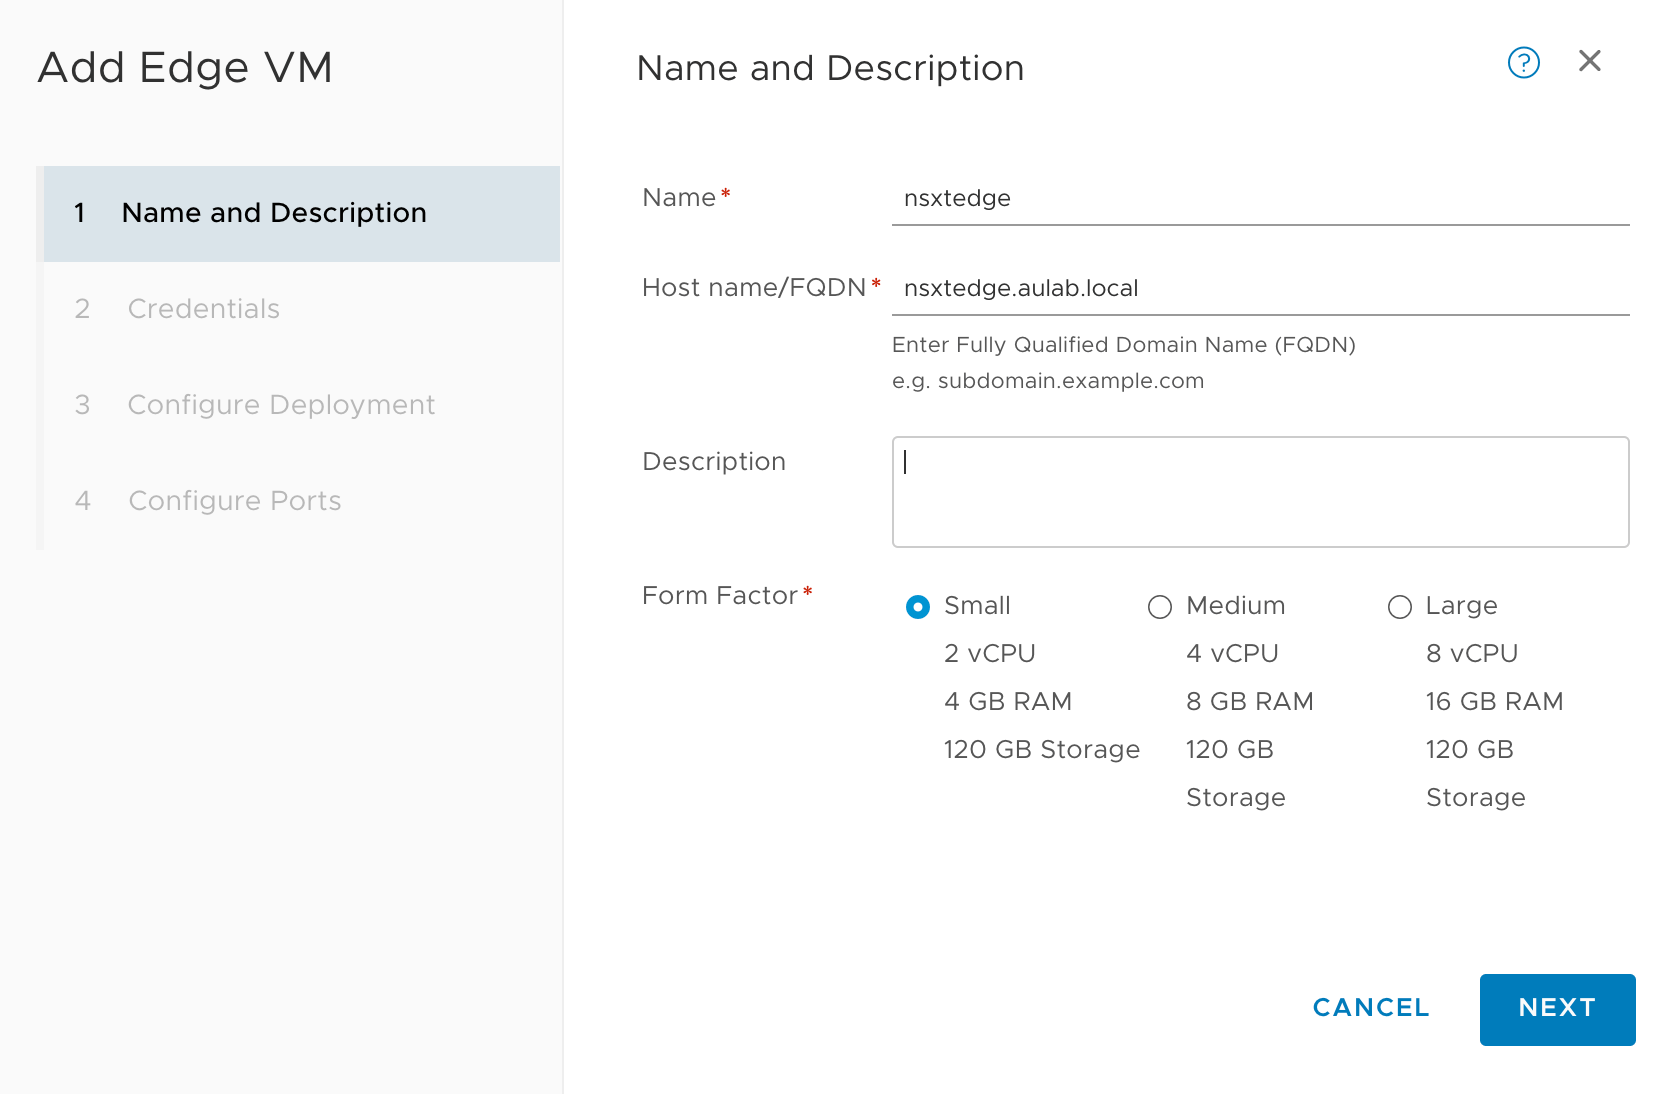
I have selected a “Small” form factor size to save my limited Homelab resources. After completing the wizard, the Edge VM gets deployed and shows up in the NSX-T Manager UI.

That’s it, all major NSX-T components are deployed but not fully configured yet. If you are interested in configuration run-through, have a look at my second NSX-T blog post “NSX-T Part2 – Simple Configuration Run-through“.
One thing I would like to point out is that you don’t need a lot of resources if you just want to play around with NSX-T in your Homelab. Here is what I have currently configured:
| Component | vCPU | Memory GB | Storage GB |
| NSX-T Manager | 2 | 8 | 140 |
| NSX-T Controller | 2 | 8 | 120 |
| NSX-T Edge | 2 | 4 | 120 |
| 6 | 20 | 380 |
But as mentioned before, always use the VMware recommended resource configuration if you deploy NSX-T in production or similar environments.
Stay tuned, I am going to write further blog posts about NSX-T and other VMware solutions.

Leave a comment